Mobile-First Authentication: Integrating with Your Back-End Applications
Dec 29, 2023
In this tutorial, we will show you how to integrate API published by our server components with your back-end applications.
Prerequisites
This tutorial assumes that you have:
- Read and understood the Problem Overview chapter
- Followed Installing Server-Side Components chapter
Task Overview
When integrating with our services, you need to perform the following tasks:
- Review the components
- Implement mobile device registration
- Implement mobile device self-service
- Implement protected API resources
- Implement out-of-band approvals (push approvals)
Review The Components
The following diagram captures the internal architecture of the installed back-end system:
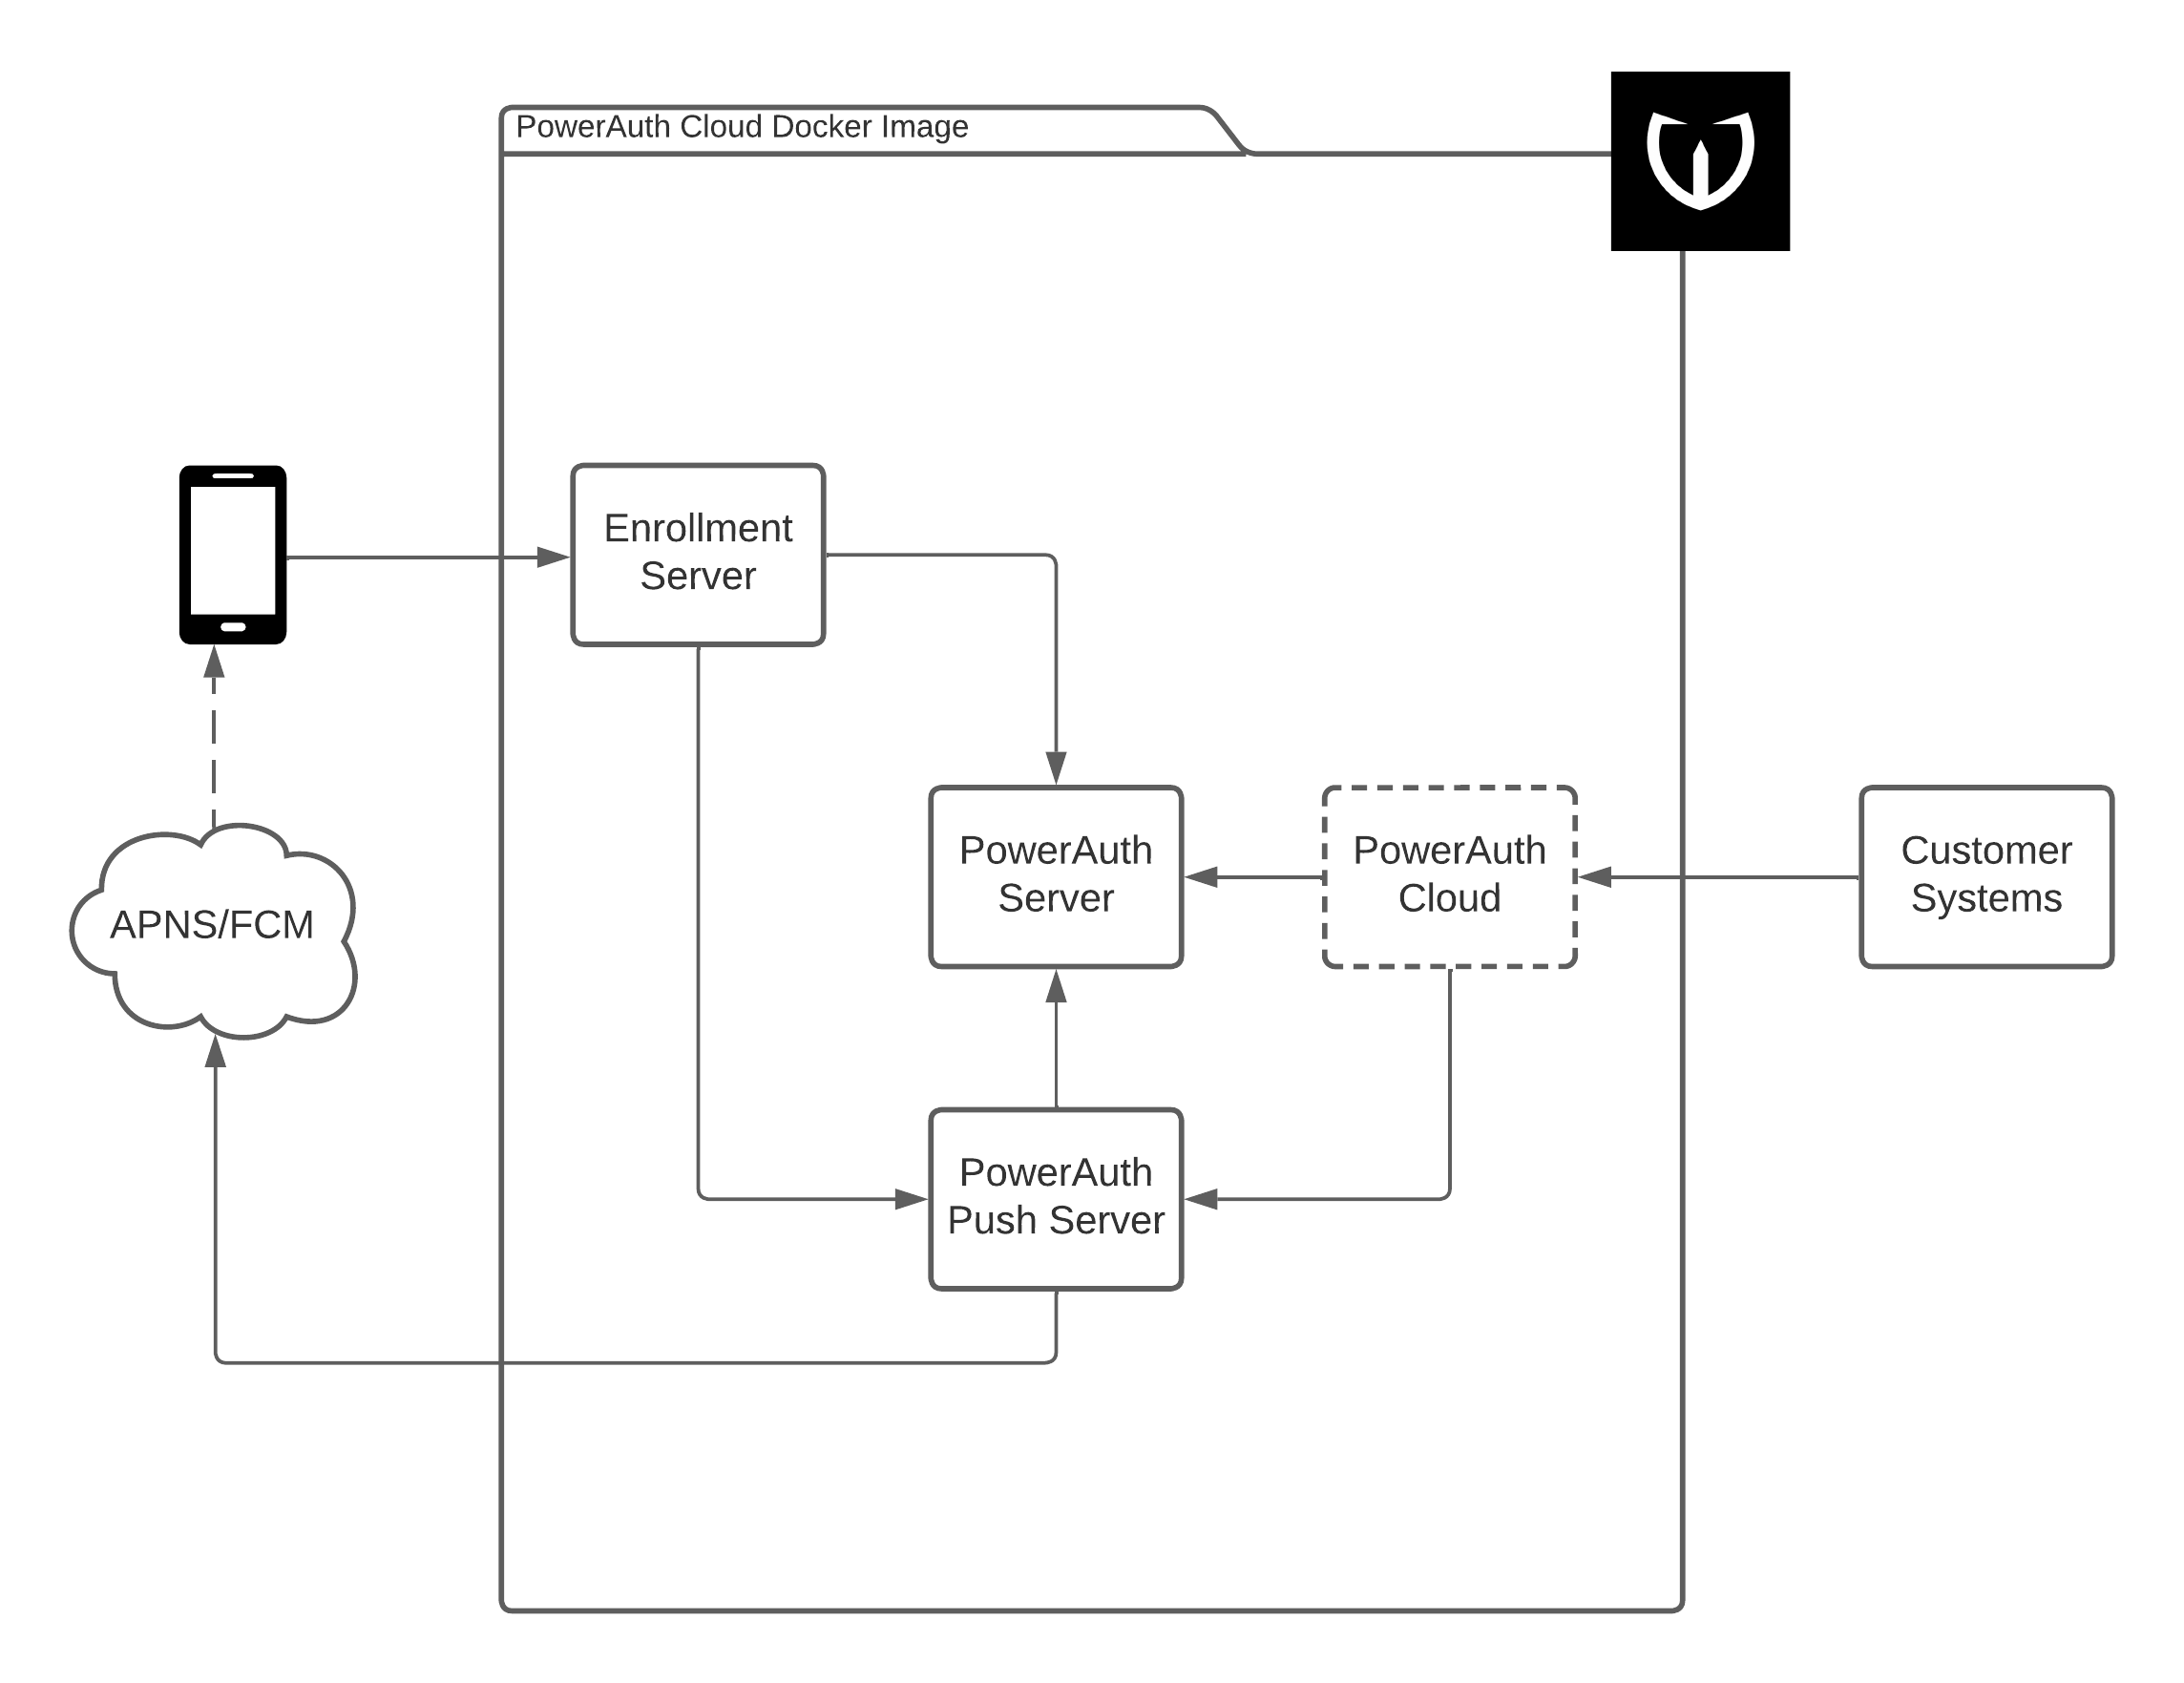
While the internal components and calls are not very important, there are two components you should pay attention to:
- PowerAuth Cloud - Proxy application available from the internal network published via
/powerauth-cloudcontext, must not be published to the public internet. Access is protected with basic HTTP authentication. - Enrollment Server - Application published to the public internet via the
/enrollment-servercontext that is accessed by the mobile clients.
During your integration effort, you only need to call PowerAuth Cloud services on /powerauth-cloud context. The Enrollment Server is intended for the mobile apps, and so you do not need to call any services on /enrollment-server context.
Implement Mobile Device Registration
The recommended way to register a new mobile device is using an activation code.
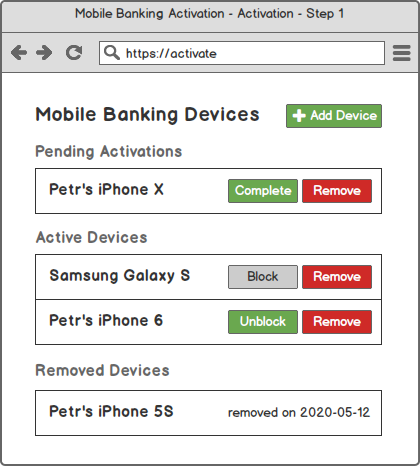
An example of the screen flow in the Internet banking is captured below:

However, the activation code can be used for registering mobile devices via any channel, including mobile-only flows.
Obtaining the Activation Code
You can generate a new activation code for a particular user ID (this is how the user identity is connected with the activation code) by calling the following service with an integration user credentials:
curl -X 'POST' \
  'http://localhost:8080/powerauth-cloud/v2/registrations' \
  -u integration-user:${INTEGRATION_PASSWORD} \
  -H 'Content-Type: application/json' \
  -d '{
    "userId": "end-user-1234",
    "appId": "my-application"
}'
Note that we used my-application as the app identifier appId, as this is the value we used as example in Installing Server-Side Components chapter. Also, the userId value is an arbitrary example value. You must use a user identifier which is specific to your systems.
The call returns the following response:
{
  "activationQrCodeData": "V42UC-HRMDV-VW57V-6LEYA#MEUCIQDswIufeNdNhkQjcZjmECeqZmYjMTHicOtixz2CAVgGIAIgc8rBeJJ22Wc2rZwj128uREZAawVD0iBMXGkl/+UPCyI=",
  "activationCode": "V42UC-HRMDV-VW57V-6LEYA",
  "activationCodeSignature": "MEUCIQDswIufeNdNhkQjcZjmECeqZmYjMTHicOtixz2CAVgGIAIgc8rBeJJ22Wc2rZwj128uREZAawVD0iBMXGkl/+UPCyI=",
  "registrationId": "c8a1faf6-2dcd-4a66-b309-43a57afa8ca6"
}
Mobile-Only Flows
When implementing a mobile-only flows, you might want to automatically commit a registration after the mobile device registers itself. To accomplish this, you need to set the activation OTP and specify the activation OTP validation mode. You must obtain any OTP value ${OTP} (it can even be randomly generated just-in-time, as we manage the hashed value), and call:
curl -X 'POST' \
  'http://localhost:8080/powerauth-cloud/v2/registrations' \
  -u integration-user:${INTEGRATION_PASSWORD} \
  -H 'Content-Type: application/json' \
  -d '{
    "userId": "end-user-1234",
    "appId": "my-application",
    "otp": "${OTP}",
    "otpValidation": "ON_KEY_EXCHANGE",
}'
After receiving the same response as above, you need to deliver the activation OTP to the mobile device, i.e., by sending it via SMS, email, or - if necessary - over the data channel, besides providing the activation code value. Mobile app will then use the activation OTP alongside the activation code and, as a result, the related registration will be auto-committed during the key exchange (as specified by the ON_KEY_EXCHANGE value).
Polling the Registration Status
You can check for the registration status at any time by calling the following endpoint with the previously obtained registration ID as the URI parameter:
curl -X 'GET' \
  'http://localhost:8080/powerauth-cloud/v2/registrations/c8a1faf6-2dcd-4a66-b309-43a57afa8ca6' \
  -u integration-user:${INTEGRATION_PASSWORD} \
  -H 'Content-Type: application/json'
The response of the call may slightly differ based on a specific registration status. For example, for a just created registration in the CREATED status, the response will look like this:
{
  "registrationId": "c8a1faf6-2dcd-4a66-b309-43a57afa8ca6",
  "registrationStatus": "CREATED",
  "applicationId": "my-application",
  "flags": [],
  "timestampCreated": 1703848436819,
  "timestampLastUsed": 1703848436819,
  "userId": "end-user-1234",
  "activationQrCodeData": "V42UC-HRMDV-VW57V-6LEYA#MEQCIFbjWRyb7JfGxQjHMTYlPQVPClmt9fDX78i1088SaLd4AiAbiQktkwiGxPELvXKmeMZmR4ms/Fbj1npdU4angLzr4w==",
  "activationCode": "V42UC-HRMDV-VW57V-6LEYA",
  "activationCodeSignature": "MEUCIQDswIufeNdNhkQjcZjmECeqZmYjMTHicOtixz2CAVgGIAIgc8rBeJJ22Wc2rZwj128uREZAawVD0iBMXGkl/+UPCyI="
}
All statuses and response structures are well documented in the RESTful API reference. However, you should be primarily interested in the registrationStatus parameter:
CREATED- The registration was just created. You can re-obtain the activation code data in this state.PENDING_COMMIT- The mobile device was registered but the registration must be committed on the server side. If relevant, you can displayactivationFingerprintat this stage so that the user can compare its value with the one displayed in the mobile app.ACTIVE- The registration is active and ready to be used.BLOCKED- The registration is blocked and needs to be unblocked to be usable.REMOVED- The registration is expired or non-existing.
Besides polling, the system also supports registration callbacks to provide an instant response. You can register your webhooks that will be called whenever registration status changes. We still recommend having polling mechanism in place as a backup, as webhooks may not be reliable.
Committing the Registration
If the registration arrives in the PENDING_COMMIT state, you must commit it by calling the commit endpoint on the server side. You can condition the commit call by some other authentication mechanism, for example, when registering via the Internet banking, you can only call the commit endpoint if an independelty sent SMS OTP is correctly validated. Whenever you are ready to commit the registration, call:
curl -X 'POST' \
  'http://localhost:8080/powerauth-cloud/v2/registrations/c8a1faf6-2dcd-4a66-b309-43a57afa8ca6/commit' \
  -u integration-user:${INTEGRATION_PASSWORD} \
  -H 'Content-Type: application/json' \
  -d '{
}'
Implement Mobile Device Self-Service
The end user should have an overview of the devices that are activated with his/her account. This is usually done by implementing a specific “self-service” section in the Internet banking. The goal of such section should be to allow typical administrative tasks, such as:
- Listing the current active devices.
- Blocking or removing an active device.
The same functionality is usually implemented in the banking back-office application, so that the bank operators can manage mobile devices for their clients.
Listing Active Devices
To list all active devices for given user, you can call the registration list endpoint with the user ID as a query parameter:
curl -X 'GET' \
  'http://localhost:8080/powerauth-cloud/v2/registrations?userId=end-user-1234' \
  -u integration-user:${INTEGRATION_PASSWORD} \
  -H 'Content-Type: application/json'
Note that this call returns only activations in active states. Use &removed=true as an additional query parameter to obtain all registrations.
The response is a simple list with registrations:
{
  "registrations": [
    {
      "registrationId": "ebfddf4d-f1ba-4d15-9300-83c16cd60f50",
      "registrationStatus": "BLOCKED",
      "blockedReason": "DEVICE_LOST",
      "applicationId": "my-application",
      "name": "John's iPhone",
      "platform": "ios",
      "deviceInfo": "iPhone10,6",
      "flags": [],
      "timestampCreated": 1655754869885,
      "timestampLastUsed": 1655760905202
    },
    {
      "registrationId": "c8a1faf6-2dcd-4a66-b309-43a57afa8ca6",
      "registrationStatus": "ACTIVE",
      "applicationId": "my-application",
      "name": "John's iPhone",
      "platform": "ios",
      "deviceInfo": "iPhone10,6",
      "flags": [],
      "timestampCreated": 1702489047761,
      "timestampLastUsed": 1702489047761
    }
  ]
}
You can use the data to show the list of devices in any administrative user interface, on web or mobile. Below is a mockup for the Internet banking capturing most of the possible states:
Block, Unblock and Remove Devices
In case you want to block an active registration, unblock a blocked one, or remove the registration completely, you can do so by calling our APIs.
To block the registration, you can call:
curl -X 'PUT' \
  'http://localhost:8080/powerauth-cloud/v2/registrations/c8a1faf6-2dcd-4a66-b309-43a57afa8ca6' \
  -u integration-user:${INTEGRATION_PASSWORD} \
  -H 'Content-Type: application/json' \
  -d '{
    "change": "BLOCK"
}'
To unblock the registration, you can call:
curl -X 'PUT' \
  'http://localhost:8080/powerauth-cloud/v2/registrations/c8a1faf6-2dcd-4a66-b309-43a57afa8ca6' \
  -u integration-user:${INTEGRATION_PASSWORD} \
  -H 'Content-Type: application/json' \
  -d '{
    "change": "UNBLOCK"
}'
To remove the registration, you can call:
curl -X 'DELETE' \
  'http://localhost:8080/powerauth-cloud/v2/registrations/c8a1faf6-2dcd-4a66-b309-43a57afa8ca6' \
  -u integration-user:${INTEGRATION_PASSWORD} \
  -H 'Content-Type: application/json'
Implement Protected API Resources
To implement use-cases such as login to mobile banking or making a payment via a mobile banking app, you need to publish API resources from your back-end components that can - besides performing the use-cases according to your business logic - verify the authentication codes produced by mobile applications against our server components.
Verifying the Authentication Code Directly
The principle of all the use-cases related to transaction signing in the mobile app is the same:
- The mobile app sends an HTTP request with request body to an API endpoint, providing the authentication code in the
X-PowerAuth-Authorizationheader. - The server side must verify the request, namely:
- Obtain the HTTP method (i.e.,
POST) and URI identifier (i.e.,/login). - Fetch the authentication code from the
X-PowerAuth-Authorizationheader. - Extract raw HTTP request body (i.e.,
{}) to obtain data (bit-by-bit) that was used for the authentication code. - Validate these values against our service (providing binary request body data as Base64 encoded value).
- Obtain the HTTP method (i.e.,
An example call for the authentication code verification can look like this:
curl -X 'POST' \
  'http://localhost:8080/powerauth-cloud/v2/signature/verify' \
  -u integration-user:${INTEGRATION_PASSWORD} \
  -H 'Content-Type: application/json' \
  -d '{
    "method": "POST",
    "uriId": "/login",
    "authHeader": "PowerAuth pa_activation_id=\"c8a1faf6-2dcd-4a66-b309-43a57afa8ca6\",pa_application_key=\"Z19gyYaW5kb521fYWN0aXZ==\", pa_nonce=\"kYjzVBB8Y0ZFabxSWbWovY==\", pa_signature_type=\"possession_knowledge\" pa_signature=\"MDEyMzQ1Njc4OWFiY2RlZjAxMjM0NTY3ODlhYmNkZWY=\", pa_version=\"3.1\"",
    "requestBody": "e30="
}'
Note that the uriId is a constant pre-shared between the mobile app and server. We recommend the name is derived from the path of the API resource. Request body bytes must be fetched from the request precisely. Any re-serialization or similar alternations can cause the data on the server to differ from the data used in the mobile app, which will result in failed verification of the authentication code.
Implement Out-of-Band Approvals
When initiating login or payment outside the mobile app, for example, in the web Internet banking, you can use our operations API to simplify out-of-band approvals via push notifications.
In our systems, an operation is any isolated, temporary, one-time activity that user should approve or reject. The flow is the same for any type of such an activity, be it login attempt approval, payment approval, or any other approval:
- Create a new operation for the specific user with given template and parameters
- Check the operation status to see the result of the operation
Creating New Operation
You can create a new operation for a particular user by calling the following service with an integration user credentials:
curl -X 'POST' \
  'http://localhost:8080/powerauth-cloud/v2/operations' \
  -u integration-user:${INTEGRATION_PASSWORD} \
  -H 'Content-Type: application/json' \
  -d '{
    "userId": "end-user-1234",
    "template": "default.payment",
    "parameters": {
        "amount": "63.99",
        "currency": "EUR",
        "account": "CZ32493745329497374923"
    }
}'
Note that we specified default.payment as the template for the operation. Our systems support any templates with any template names, and each template can have specific set of string parameters. In this case, we have three parameters named amount, currency and account, but the names can differ based on the template and the use-case.
The call returns the following response:
{
    "operationId": "bd75ce63-a89f-4258-b172-5e51ced8df14",
    "userId": "end-user-1234",
    "status": "PENDING",
    "template": "default.payment",
    "operationType": "payment",
    "parameters": {
        "amount": "63.99",
        "currency": "EUR",
        "account": "CZ32493745329497374923"
    },
    "failureCount": 0,
    "maxFailureCount": 5,
    "timestampCreated": 1703852368813,
    "timestampExpires": 1703852668813
}
You need to store the operation ID so that you can check the operation status later.
Polling the Registration Status
You can check for the operation status at any time by calling the following endpoint with the previously obtained operation ID as the URI parameter:
curl -X 'GET' \
  'http://localhost:8080/powerauth-cloud/v2/operations/bd75ce63-a89f-4258-b172-5e51ced8df14' \
  -u integration-user:${INTEGRATION_PASSWORD} \
  -H 'Content-Type: application/json'
The response of the call may slightly differ based on a specific operation status. For example, for a just created operation in the PENDING status, the response will look like this:
{
    "operationId": "bd75ce63-a89f-4258-b172-5e51ced8df14",
    "userId": "end-user-1234",
    "status": "PENDING",
    "template": "default.payment",
    "operationType": "payment",
    "parameters": {
        "amount": "63.99",
        "currency": "EUR",
        "account": "CZ32493745329497374923"
    },
    "additionalData": {},
    "failureCount": 0,
    "maxFailureCount": 5,
    "timestampCreated": 1703852368813,
    "timestampExpires": 1703852668813
}
All statuses and response structures are well documented in the RESTful API reference. However, you should be primarily interested in the status parameter:
PENDING- The operation was just created and is pending approval.CANCELED- The operation was canceled by calling the API to remove the operation.EXPIRED- The operation expired.APPROVED- The operation was actively approved by the user.REJECTED- The operation was actively rejected by the user.FAILED- The operation approval failed due to too many failed approval attempts.
Besides polling, the system also supports operation callbacks to provide an instant response. You can register your webhooks that will be called whenever operation status changes. We still recommend having polling mechanism in place as a backup, as webhooks may not be reliable.
Continue Reading
You can proceed with one of the following chapters:
- Problem Overview
- Installing Server-Side Components
- Integrating with Your Back-End Applications
- Implementing Mobile-First Authentication on iOS
- Implementing Mobile-First Authentication on Android
Resources
You can find more details our reference documentation:
