Usage
Usage of this SDK is highly dependent on your use case. The following sections show common usage scenarios and principles.
Naming conventions
| Name | Explanation |
|---|---|
| Activation | PowerAuth activation inside the PowerAuth instance in which the user enrolled. |
| Activation Data | Data retrieved from the server by the Source App that can activate Target App. |
| Source App | Application that is starting the activation spawn process with a valid Activation. |
| Target App | Application that will be installed (if not already) and activated. |
Integrating into the Source App
Prerequisite of an application that will activate the Target App is properly configured and activated
PowerAuthinstance.
- Define the Target App in your code:
  const application = new WASApplication(
        "myScheme",        // deeplink scheme of the Target
        "123456789",       // App Store ID of the Target App
        "com.example.app", // Package Name of the Target App (on Android)
        "demo"             // Identification on the backend (needed to retrieve activation data)
    )
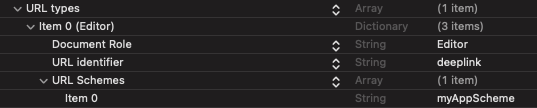
- In your iOS app, declare deeplink “permissions” for the URL scheme of Target App in the
Info.plistof the Source App.

- If your application targets Android 11+ (SDK 30+), you need to declare the query “permissions”
for the package name of Target App in the
AndroidManifest.xmlof the Source App. Otherwise, you won’t be able to detect if the app is already installed.
For more information, visit official documentation

Enable queries inside the Android manifest.

You can also enable all queries inside the Android manifest. This approach is not recommended and may be rejected during Google Play review!
- Integrate into your code.
-
Sample implementation:
// Configured and activated PowerAuth instance.
const powerauth: PowerAuth!

// Additional data for generator (must be the same for both Source and Target App).
const additionalData = "c29tZS1hZGRpdGlvbmFsLWRhdGE=" // random Base64 data
// Additional data for transporter (must be the same for both Source and Target App).
const sharedInfo = "c29tZS1zaGFyZWQtaW5mbw==" // random Base64 data

// create semi-stable configuration for transporter, that expect both apps will be signed with the same team account
const config = WASTransporterConfig.semiStable(true, 10)

// target application (that will be activated)
const application = new WASApplication(
    "myScheme",        // deeplink scheme of the Target
    "123456789",       // App Store ID of the Target App
    "com.example.app", // Package Name of the Target App (on Android)
    "demo"             // Identification on the backend (needed to retrieve activation data)
)

// create instances
const transporter = new WASTransporter(transporterConfig, additionalData)
const activator = new WASActivator(powerauth)

async function verifyTargetInstalled() {
    // verify if the target app is already installed
    const isInstalled = await application.isInstalled()
    console.log(`Is the target app ${application.deeplinkScheme} installed: ${isInstalled}`)
}

async function installTargetApp() {
    // open the AppStore or Play Store page of the target app
    await application.openStoreProductPage()
}

async function activateTargetApp() {

    // You need to authenticate the user with 2-factor scheme.
    // Note that for this you need to prompt the user for PIN code/password
    // or use biometry.
    // For demo purposes, we assume that the user has pin 1234.
    const auth = PowerAuthAuthentication.password("1234")

    const data = await activator.retrieveActivationData(application, auth)
    console.log(`Retrieved activation data: ${JSON.stringify(data)}`)

    await transporter.transport(
        data.toTransportData(),  // data that will be encrypted and transported to the Target
        application,  // target application
        "fromMyApp", // optional annotation that is available without decryption in the Target App
        sharedInfo // shared info that will be used for encryption (must be the same in both apps)
    )
}
Integrating into the Target App
- On iOS, declare a URL scheme for the application to enable digesting the deeplink.
- On Android, declare an intent filter for the application to enable digesting the deeplink.

- Retrieve the activation data from a deeplink and activate PowerAuth instance.
We use Custom-URL-scheme plugin in the following example to handle deeplinks in Cordova. You can use any other plugin or your own implementation.
    // Configured and NOT activated PowerAuth instance.
    const powerauth: PowerAuth

    // create instances
    const processor = new WASProcessor(transporterConfig, additionalData)
    const activator = new WASActivator(powerauth)

    // Configured and activated PowerAuth instance.
    const powerauth: PowerAuth!

    // Additional data for generator (must be the same for both Source and Target App).
    const additionalData = "c29tZS1hZGRpdGlvbmFsLWRhdGE=" // random Base64 data
    // Additional data for transporter (must be the same for both Source and Target App).
    const sharedInfo = "c29tZS1zaGFyZWQtaW5mbw==" // random Base64 data

    // create semi-stable configuration for transporter, that expect both apps will be signed with the same team account
    const config = WASTransporterConfig.semiStable(true, 10)

    // This function will be called when the app is opened via deeplink (Custom-URL-scheme plugin, not part of this SDK!)
    async function handleOpenURL(url: string) {
        try {
            const result = await processor.validate(url)
            console.log(`App opened from deeplink. Deeplink is valid. Annotation retrieved: ${result.annotation}`)

            const processedData = await processor.process(url, sharedInfo)
            console.log(`App opened from deeplink. Processed data: ${processedData}.`)
            const data = WASActivationData.fromProcessedData(processedData)
            console.log(`ActivationCode: ${data.activationCode}, OTP: ${data.otp}`)

            const activation = PowerAuthActivation.createWithActivationCode(data.activationCode, "John's iphone")
            activation.additionalActivationOtp = data.otp
            await powerauth.createActivation(activation)
            //... follow up with the activation based on the PowerAuth documentation

        } catch (error) {
            console.log(`Error processing deeplink: ${url}`)
            // process the error
        }
    }
Passing custom data
annotation
Annotation is a string in the deeplink and is accessible without the need to decrypt the data.
This is good, for example, if you want to pass some data that will help you with decoding, like the ID of the Source App or other public data. Always assume that the annotation data can be logged as plain text in the system console.
Example usage of annotation:
// In the source app:
await transporter.transport(
    data.toTransportData(),  // data that will be encrypted and transported to the Target
    application,  // target application
    "fromMyApp", // optional annotation that is available without decryption in the Target App
    sharedInfo // shared info that will be used for encryption (must be the same in both apps)
)

// In the target app
const validationResult = await processor.validate(url)

// validationResult.annotation == "fromMyApp"
Error handling and logging
Exceptions
All methods that can produce an error throw WASError exceptions. You can catch these exceptions and process them in your code.
You can use the isWasError helper function to check if the exception is of type WASError.
Logging
Advanced logging will be added in the future release.