Usage (without PowerAuth)
Integrating the Wultra Activation Spawn SDK for Android into your application is a straightforward process, designed to be developer-friendly and efficient. However, to ensure seamless functionality, it is crucial to maintain consistent configuration settings across both the target and source applications. This consistency is essential for the SDK to operate correctly and securely.
Naming conventions
| Explanation | |
|---|---|
| Source App | Application that is starting the activation spawn process with data to transfer. |
| Target App | Application that will be installed (if not already) and will receive data. |
Integrating into the Source App
- Define the Target App in your code:
  import com.wultra.android.activationspawn.SpawnableApplication

  val application = SpawnableApplication(
	    // package name of the app
	    "com.mycompany.android.application.demoapp",
	    // url deeplink scheme
	    "demoAppScheme"
  )
- If your application targets Android 11+ (SDK 30+), you need to declare the query “permissions”
for the package name of Target App in the
AndroidManifest.xmlof the Source App. Otherwise, you won’t be able to detect if the app is already installed.
For more information, visit official documentation

Enable queries inside the Android manifest.

You can also enable all queries inside the Android manifest. This approach is not recommended if not needed otherwise.
- Integrate into your
ViewModel.
-
Sample implementation:
import android.content.Context
import androidx.lifecycle.ViewModel
import com.wultra.android.activationspawn.*

class SampleViewModel(powerAuth: PowerAuthSDK, appContext: Context): ViewModel() {

    // Additional data for transporter (must be the same for both Source and Target App).
    var additionalData: ByteArray? = null
    // Additional data for the app (must be the same for both Source and Target App).
    var sharedInfo: ByteArray? = null

    // application that can be activated
    val application = SpawnableApplication("com.mycompany.myapp", "myappdeeplink")

    // Note that the transporter configuration must be the same
    // for both Target and Source App. Please consult with Wultra
    // what configuration suits your needs.
    private val transporterConfig = TransporterConfig.semiStable(false, 10)

    // transporter that launches the transport process
    private val transporter = Transporter(appContext, transporterConfig, additionalData)

    fun isAppInstalled(): Boolean {
        return transporter.isInstalled(application)
    }

    fun installApp() {
        // SpawnManager will open store with the application page.
        return transporter.openStore(application)
    }

    fun transportData() {
        val data = "myDataToTransfer".toByteArray() // data that I want to transport. Usually json data
        val annotation = "MyDemoApp" // Tell the target app who is the source
        transporter.transportDataToApp(data, application, annotation, sharedInfo)
    }
}
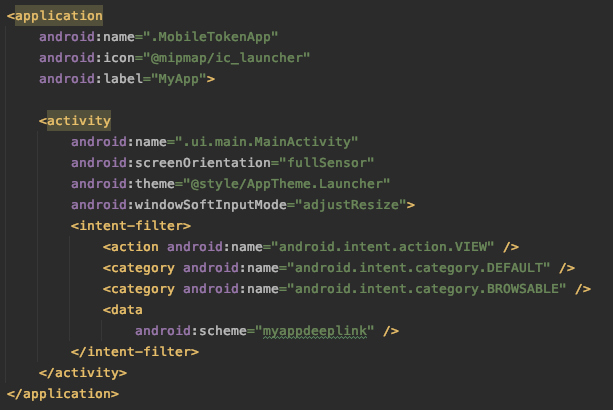
Integrating into the Target App
- Declare a URL scheme for the application to enable digesting the deeplink.
-
Retrieve the data from a deeplink.
 import android.app.Activity
 import android.os.Bundle
 import com.wultra.android.activationspawn.*

 class TestActivity: Activity() {

     // dependencies you need to prepare
     private lateinit var processor: Processor

     // Note that the transporter configuration must be the same
     // for both Target and Source App. Please consult with Wultra
     // what configuration suits your needs.
     private val transporterConfig = TransporterConfig.semiStable(false, 10)

     // Additional data for transporter (must be the same for both Source and Target App).
     private val additionalData: ByteArray? = null
     // Additional data for the app (must be the same for both Source and Target App).
     private val sharedInfo: ByteArray? = null

     override fun onCreate(savedInstanceState: Bundle?) {
         super.onCreate(savedInstanceState)

         processor = Processor(applicationContext, transporterConfig, additionalData)

         val data = intent.data
         if (data != null) {
             try {
                 val annotation = processor.validateDeeplink(data).getOrNull()?.annotation
                 val transportData = processor.processDeeplink(data, sharedInfo)
                 if (annotation == "MyDemoApp") {
                     // do something based on the source app
                 }
                 // continue processing raw transportData
             } catch (t: Throwable) {
                 // deeplink cannot be processed
             }
         }
     }
}
Passing additional data
For your convenience, you can pass additional data from the Source App to the Target App.
annotation
Annotation is a string in the deeplink and is accessible without the need to decrypt the data.
This is good for example if you want to pass some data that will help you with decoding, like the id of the Source App or other public data. Always assume that the annotation data can be logged as plain-text in the system console.
Example usage of annotation:
// In the source app:
transporter.transportDataToApp(data, application, "annotationData", sharedInfo)

// In the target app
processor.validateDeeplink(url)
	.onSuccess {
       // validated
		Log.d("aspawn", it.annotation) // prints "annotationData"
    }.onFailure {
      // invalid activation spawn deeplink
	}
Error handling and logging
If you have a problem with syncing your Source and Target App configuration, we recommend turning on debug logging by ActivationSpawnLogger.verboseLevel = ActivationSpawnLogger.VerboseLevel.DEBUG
Exceptions
All methods that can produce an error are throwing various exceptions (as described in the in-code documentation).
All exceptions use message property where details about the exception and possible solutions are explained (in the description property). We highly recommend logging these exceptions into your log system as they provide great debug value about what went wrong.
ProcessDeeplinkException and TransportDataException exceptions contain reason property with the enum value of the error description for convenience.
Logging
The library is intensively logging into the console via ActivationSpawnLogger.
Possible log levels:
DEBUG- Debug logging that outputs more granular data, use this only during developmentINFO- prints info logs + logs for warning level produced by the library (default level)WARNING- prints warnings and errorsERROR- prints errors onlyOFF- logging is turned off
You can set the log level by ActivationSpawnLogger.verboseLevel = ActivationSpawnLogger.VerboseLevel.OFF.
ActivationSpawnLogger calls internally android.util.Log class.
Log Listener
The ActivationSpawnLogger class offers a static logListener property. If you provide a listener, all logs will also be passed to it (the library always logs into the Android default log).
Log listener comes in handy when you want to log into a file or some online service.