How to test PDF document signing via Signer Cloud
This is a step-by-step guide on how to test PDF document signing via Signer Cloud using the PowerAuth stack.
These components are required:
- PowerAuth Server (code, portal) with Enrollment Server (code, portal) OR PowerAuth Cloud (code, portal)
- Signer Cloud (code, portal)
- PowerAuth cmd tool (code)
- EJBCA (documentation)
The minimum required version of the PowerAuth stack is >= 1.10.
The only exception is the PowerAuth cmd tool, which requires version >= 2.0. Since version 2.0 has not been published yet,
download the repository and build it from the develop branch. This is why version 2.0.0-SNAPSHOT is used in all commands.
EJBCA Community Edition version 9.1.1 is required. A Docker image is available here.
Used abbreviations:
| Abbreviation | Description |
|---|---|
| CRI | Certificate Request Information, part of CSR that contains all the information needed for certificate issuance, including the owner’s details, public key, and requested extensions |
| CSR | Certificate Signing Request, the full request sent to a Certification Authority to enroll a certificate |
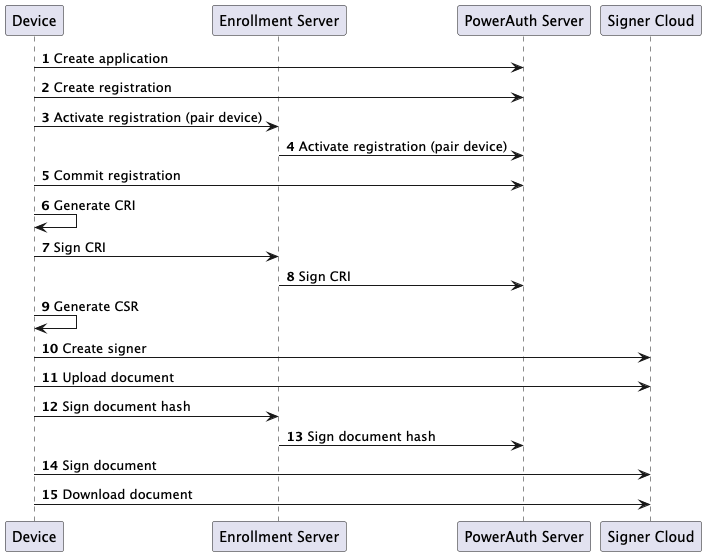
Local Environment
This section describes how to sign a document locally. Below is a sequence diagram of all the required steps.
| Component | URL |
|---|---|
| PowerAuth Server | https://localhost:8080 |
| Enrollment Server | https://localhost:8081 |
| Signer Cloud | https://localhost:8090 |
| EJBCA | https://localhost:8091 |
Create a new application
Create a new application with name sc-demo-app in PowerAuth Server:
curl -X 'POST' \
  'http://localhost:8080/powerauth-java-server/rest/v3/application/create' \
  -H 'accept: */*' \
  -H 'Content-Type: application/json' \
  -d '{
  "requestObject": {
    "applicationId": "sc-demo-app"
  }
}'
An HTTP 200 OK response should be returned.
Prepare SDK config
Obtain the mobileSdkConfig of the created app to use the PowerAuth cmd tool:
curl -X 'POST' \
  'http://localhost:8080/powerauth-java-server/rest/v3/application/detail' \
  -H 'accept: */*' \
  -H 'Content-Type: application/json' \
  -d '{
  "requestObject": {
    "applicationId": "sc-demo-app"
  }
}'
An HTTP 200 OK response should be returned:
{
  "status" : "OK",
  "responseObject" : {
    "applicationId" : "sc-demo-app",
    "masterPublicKey" : "BLCnzfKdPwavBciRDYsQULSlkETGZ8ZFkVtXAXvZutdWBY4QMk691RqhVxLVF7hyCR1TUbLkZRHY5AYLSZXFkGM=",
    "applicationRoles" : [ ],
    "versions" : [ {
      "applicationVersionId" : "default",
      "applicationKey" : "5LkatEqR0jG1AvJ4vQetZA==",
      "applicationSecret" : "iXyCeo1prHJFeGpN1m6Mgg==",
      "mobileSdkConfig" : "ARDkuRq0SpHSMbUC8ni9B61kEIl8gnqNaaxyRXhqTdZujIIBAUEEsKfN8p0/Bq8FyJENixBQtKWQRMZnxkWRW1cBe9m611YFjhAyTr3VGqFXEtUXuHIJHVNRsuRlEdjkBgtJlcWQYw==",
      "supported" : true
    } ]
  }
}
Create config file for PowerAuth cmd tool
Create a configuration file with the following structure and save it as sdk_config.json.
The values for applicationName and mobileSdkConfig are taken from the response in the previous step.
{
  "applicationName": "sc-demo-app",
  "mobileSdkConfig": "ARDkuRq0SpHSMbUC8ni9B61kEIl8gnqNaaxyRXhqTdZujIIBAUEEsKfN8p0/Bq8FyJENixBQtKWQRMZnxkWRW1cBe9m611YFjhAyTr3VGqFXEtUXuHIJHVNRsuRlEdjkBgtJlcWQYw=="
}
Create registration
Create a new device registration request for the application sc-demo-app in PowerAuth Server.
The userId can be any arbitrary value, as there are no checks or preconditions.
This step and the next two steps (committing the operation as the last one) must be completed quickly, because by default there is only a short time window of a few minutes to finish the registration.
curl --location 'http://localhost:8080/powerauth-java-server/rest/v3/activation/init' \
--header 'Content-Type: application/json' \
--data '{
    "requestObject": {
        "userId": "sc-demo-user",
        "applicationId": "sc-demo-app"
    }
}
'
An HTTP 200 OK response should be returned:
{
  "status" : "OK",
  "responseObject" : {
    "activationId" : "17056bde-9e5c-4bcc-9001-fa1fef3b5965",
    "activationCode" : "VPBZ7-TVV43-P7J4Y-GCX4A",
    "activationSignature" : "MEUCIQC1G1i2Va5CPFPMH5qqVLNS4qQKTbCBkJ2qhW3wF668awIgNZzz5uIZQws+mexfMp5Gf++QdZwOb5ONp/mbpXBOuks=",
    "userId" : "sc-demo-user",
    "applicationId" : "sc-demo-app"
  }
}
Register device
Register your “device” via PowerAuth cmd tool:
java -jar powerauth-java-cmd-2.0.0-SNAPSHOT.jar \
    --url "http://localhost:8081/enrollment-server" \
    --status-file "./device_status.json" \
    --config-file "./sdk_config.json" \
    --method "create" \
    --password "1234" \
    --version "3.3" \
    --activation-code "VPBZ7-TVV43-P7J4Y-GCX4A"
This command creates device_status.json which works as your “device”.
{
  "transportMasterKey" : "Yo8vMV0vbX5PpUhaC1AMZw==",
  "activationId" : "17056bde-9e5c-4bcc-9001-fa1fef3b5965",
  "ecServerPublicKey" : "BEHzHdq7hD1JwFzILNkvwsCcrslEKmd8jKYs7a+1DUSGyXp5OYoTdWi6J3y95ET6xvoOBAlfuOy1suZ9UH3/CMA=",
  "possessionFactorKey" : "lvRBd/PCPl1JZtIhsC5agg==",
  "knowledgeFactorKeySalt" : "3SkCj/2LJd6dlTNx3wN9sg==",
  "knowledgeFactorKeyEncrypted" : "M22KU/cdg74MnRQotNImag==",
  "ctrData" : "a5vY4SThfIDoCS/e3SXeeg==",
  "counter" : 0,
  "encryptedEcDevicePrivateKey" : "7woDnfYlzg5sz4XHffNEZb9XZEu7UToihJi0hVgS/hP5DHaDnIKDiBjbT23lLzL+",
  "ecDevicePublicKey" : "BHzYZvC6tmL/xFEXX2dLTp/Cm3pgL4OWBhoFq9jaytT/CdwoRaSZ0o12QzLVfun/4qq9fqqJ3gvFdqpFn9GwHSA=",
  "biometryFactorKey" : "3rwz+0XxMYKWNLynB5IVeA==",
  "sharedSecretAlgorithm" : "EC_P256",
  "version" : 3
}
Commit registration
As the last step, commit the registration. The activationId can be found in device_status.json or in the command output.
Be careful—this is a different value from the activationCode.
curl -X 'POST' \
  'http://localhost:8080/powerauth-java-server/rest/v3/activation/commit' \
  -H 'accept: */*' \
  -H 'Content-Type: application/json' \
  -d '{
  "requestObject": {
    "activationId": "17056bde-9e5c-4bcc-9001-fa1fef3b5965",
    "externalUserId": "sc-demo-app"
  }
}'
An HTTP 200 OK response should be returned.
As optional step, you can verify status of the registration.
java -jar powerauth-java-cmd-2.0.0-SNAPSHOT.jar \
    --url "http://localhost:8081/enrollment-server" \
    --status-file "./device_status.json" \
    --config-file "./sdk_config.json" \
    --version "3.3" \
    --method "status"
In the response you should see "activationStatusName" : "ACTIVE"
Generate CRI
Use code from Java code for generating CRI.
Set value of PUBLIC_KEY_BASE64 constant to ecDevicePublicKey from the device_status.json file:
private static final String PUBLIC_KEY_BASE64 = "BHzYZvC6tmL/xFEXX2dLTp/Cm3pgL4OWBhoFq9jaytT/CdwoRaSZ0o12QzLVfun/4qq9fqqJ3gvFdqpFn9GwHSA=";
When you have the CRI, save it into cri.pem file as bytes:
echo "MIGYAgEAMDYxETAPBgNVBAMMCEpvaG4gRG9lMRQwEgYDVQQKDAtFeGFtcGxlQ29ycDELMAkGA1UEBhMCVVMwWTATBgcqhkjOPQIBBggqhkjOPQMBBwNCAAR82GbwurZi/8RRF19nS06fwpt6YC+DlgYaBavY2srU/wncKEWkmdKNdkMy1X7p/+KqvX6qid4LxXaqRZ/RsB0goAA=" | base64 --decode > cri.der
Sign CRI
Sign the CRI via PowerAuth cmd tool:
java -jar powerauth-java-cmd-2.0.0-SNAPSHOT.jar \
    --url "http://localhost:8081/enrollment-server" \
    --status-file "./device_status.json" \
    --config-file "./sdk_config.json" \
    --method "sign-asymmetric" \
    --auth-code-type "possession_knowledge" \
    --data-file "cri.der" \
    --version "3.3" \
    --password "1234"
The signature is value of signature field from command line output:
"signature" : "MEUCIFM/zV52N+WM6kHVzJePDAKYNkKxmHIK5Ywx/QWnB9S6AiEA3QlITRs/sPyjT/iVPWKXPRUcLfERqk/Ph2LzUQczH4k="
Generate CSR
Use code in Java code for generating CSR.
Adjust values of CRI_BASE_64 and SIGNATURE_BASE64 constants obtained in previous steps:
private static final String CRI_BASE_64 = "MIGYAgEAMDYxETAPBgNVBAMMCEpvaG4gRG9lMRQwEgYDVQQKDAtFeGFtcGxlQ29ycDELMAkGA1UEBhMCVVMwWTATBgcqhkjOPQIBBggqhkjOPQMBBwNCAAR82GbwurZi/8RRF19nS06fwpt6YC+DlgYaBavY2srU/wncKEWkmdKNdkMy1X7p/+KqvX6qid4LxXaqRZ/RsB0goAA=";
private static final String SIGNATURE_BASE64 = "MEUCIFM/zV52N+WM6kHVzJePDAKYNkKxmHIK5Ywx/QWnB9S6AiEA3QlITRs/sPyjT/iVPWKXPRUcLfERqk/Ph2LzUQczH4k=";
Create signer
When you have CSR, you can create a signer in Signer Cloud by calling following endpoint.
The externalSignerId is activationId, userId can be any random value and the csr was obtained in previous step. It is already in correct format.
Any call to the Signer Cloud must contain proper authorization. See Signer Cloud Authorization.
curl --location 'http://127.0.0.1:8090/signers' \
--header 'Content-Type: application/json' \
--header 'Authorization: ••••••' \
--data '{
    "externalSignerId" : "17056bde-9e5c-4bcc-9001-fa1fef3b5965",
    "userId" : "sc-demo-user",
    "csr": "-----BEGIN CERTIFICATE REQUEST-----\nMIHxMIGYAgEAMDYxETAPBgNVBAMMCEpvaG4gRG9lMRQwEgYDVQQKDAtFeGFtcGxl\nQ29ycDELMAkGA1UEBhMCVVMwWTATBgcqhkjOPQIBBggqhkjOPQMBBwNCAAR82Gbw\nurZi/8RRF19nS06fwpt6YC+DlgYaBavY2srU/wncKEWkmdKNdkMy1X7p/+KqvX6q\nid4LxXaqRZ/RsB0goAAwCgYIKoZIzj0EAwIDSAAwRQIgUz/NXnY35YzqQdXMl48M\nApg2QrGYcgrljDH9BacH1LoCIQDdCUhNGz+w/KNP+JU9Ypc9FRwt8RGqT8+HYvNR\nBzMfiQ==\n-----END CERTIFICATE REQUEST-----\n"
}'
An HTTP 200 OK response should be returned
Upload document for signing
Upload the document you want to sign. The values for externalId and name can be arbitrary.
Visual signature can be added as optional parameter. See Document Visual Signature.
curl --location 'http://127.0.0.1:8090/documents' \
--header 'Authorization: Basic dXNlcjo0ODVmNDNhYS02NThlLTQ0YTUtOTk3OC1mY2U4Yjk5MzY0MzU=' \
--form 'externalSignerId="17056bde-9e5c-4bcc-9001-fa1fef3b5965"' \
--form 'externalId="external-id-example"' \
--form 'name="Demo document"' \
--form 'file=@"/Users/michalrozehnal/repository/wultra/signer-cloud/signer-cloud-server/src/test/resources/input.pdf"'
An HTTP 200 OK response should be returned:
{
  "documentId": "747019f6-a39f-447a-9649-47050413d085",
  "externalSignerId": "17056bde-9e5c-4bcc-9001-fa1fef3b5965",
  "externalId": "external-id-example",
  "name": "Demo document",
  "fileName": "input.pdf",
  "size": 7757,
  "hash": "MYG2MBgGCSqGSIb3DQEJAzELBgkqhkiG9w0BBwEwLwYJKoZIhvcNAQkEMSIEILlesfCjaWxckr2sIz6AukjCl8roiGqNJVRAmhM6JXgWMGkGCyqGSIb3DQEJEAIvMVowWDBWMFQEIHO7/Mhyxl0aLfIzufYli2M/sfWDX/Fdpo35d5WhWIQDMDAwGKQWMBQxEjAQBgNVBAMMCUlzc3VpbmdDQQIUN0r6O6nA1TdVyUerZpJ/k272KDY="
}
Sign document hash
Retrieve the value of hash from the response in the previous step and save it as bytes in a file named hash.bin:
echo "MYG2MBgGCSqGSIb3DQEJAzELBgkqhkiG9w0BBwEwLwYJKoZIhvcNAQkEMSIEILlesfCjaWxckr2sIz6AukjCl8roiGqNJVRAmhM6JXgWMGkGCyqGSIb3DQEJEAIvMVowWDBWMFQEIHO7/Mhyxl0aLfIzufYli2M/sfWDX/Fdpo35d5WhWIQDMDAwGKQWMBQxEjAQBgNVBAMMCUlzc3VpbmdDQQIUN0r6O6nA1TdVyUerZpJ/k272KDY=" | base64 --decode > hash.bin
Now sign the hash via PowerAuth cmd tool:
java -jar powerauth-java-cmd-2.0.0-SNAPSHOT.jar \
    --url "http://localhost:8081/enrollment-server" \
    --status-file "./device_status.json" \
    --config-file "./sdk_config.json" \
    --method "sign-asymmetric" \
    --auth-code-type "possession_knowledge" \
    --data-file "hash.bin" \
    --version "3.3" \
    --password "1234"
You can find the signature in signature field in output:
"signature" : "MEQCIBb9qijanqZypRKjMW1tw7Z1YeQSFeEKzhNwo36wghbnAiB/99dQF3fGvzcUq/kQsFpcNKxmJ+XnbJjSVzZ3GnUNlg=="
Sign the document
Use the signature value from previous step and documentId in path from document upload response:
curl --location 'http://127.0.0.1:8090/documents/747019f6-a39f-447a-9649-47050413d085/signature' \
--header 'Content-Type: application/json' \
--header 'Authorization: Basic dXNlcjo0ODVmNDNhYS02NThlLTQ0YTUtOTk3OC1mY2U4Yjk5MzY0MzU=' \
--data '{
    "signature": "MEQCIBb9qijanqZypRKjMW1tw7Z1YeQSFeEKzhNwo36wghbnAiB/99dQF3fGvzcUq/kQsFpcNKxmJ+XnbJjSVzZ3GnUNlg=="
}'
An HTTP 200 OK response should be returned:
{
    "documentId": "747019f6-a39f-447a-9649-47050413d085",
    "uri": "http://127.0.0.1:8090/documents/747019f6-a39f-447a-9649-47050413d085/download"
}
If you want to add a timestamp from a TSA (Time Stamping Authority) server, please see Document Signature Level.
Download signed document
Use same documentId in path as in previous step:
curl --location 'http://127.0.0.1:8090/documents/747019f6-a39f-447a-9649-47050413d085/file' \
--header 'Authorization: Basic dXNlcjo0ODVmNDNhYS02NThlLTQ0YTUtOTk3OC1mY2U4Yjk5MzY0MzU='
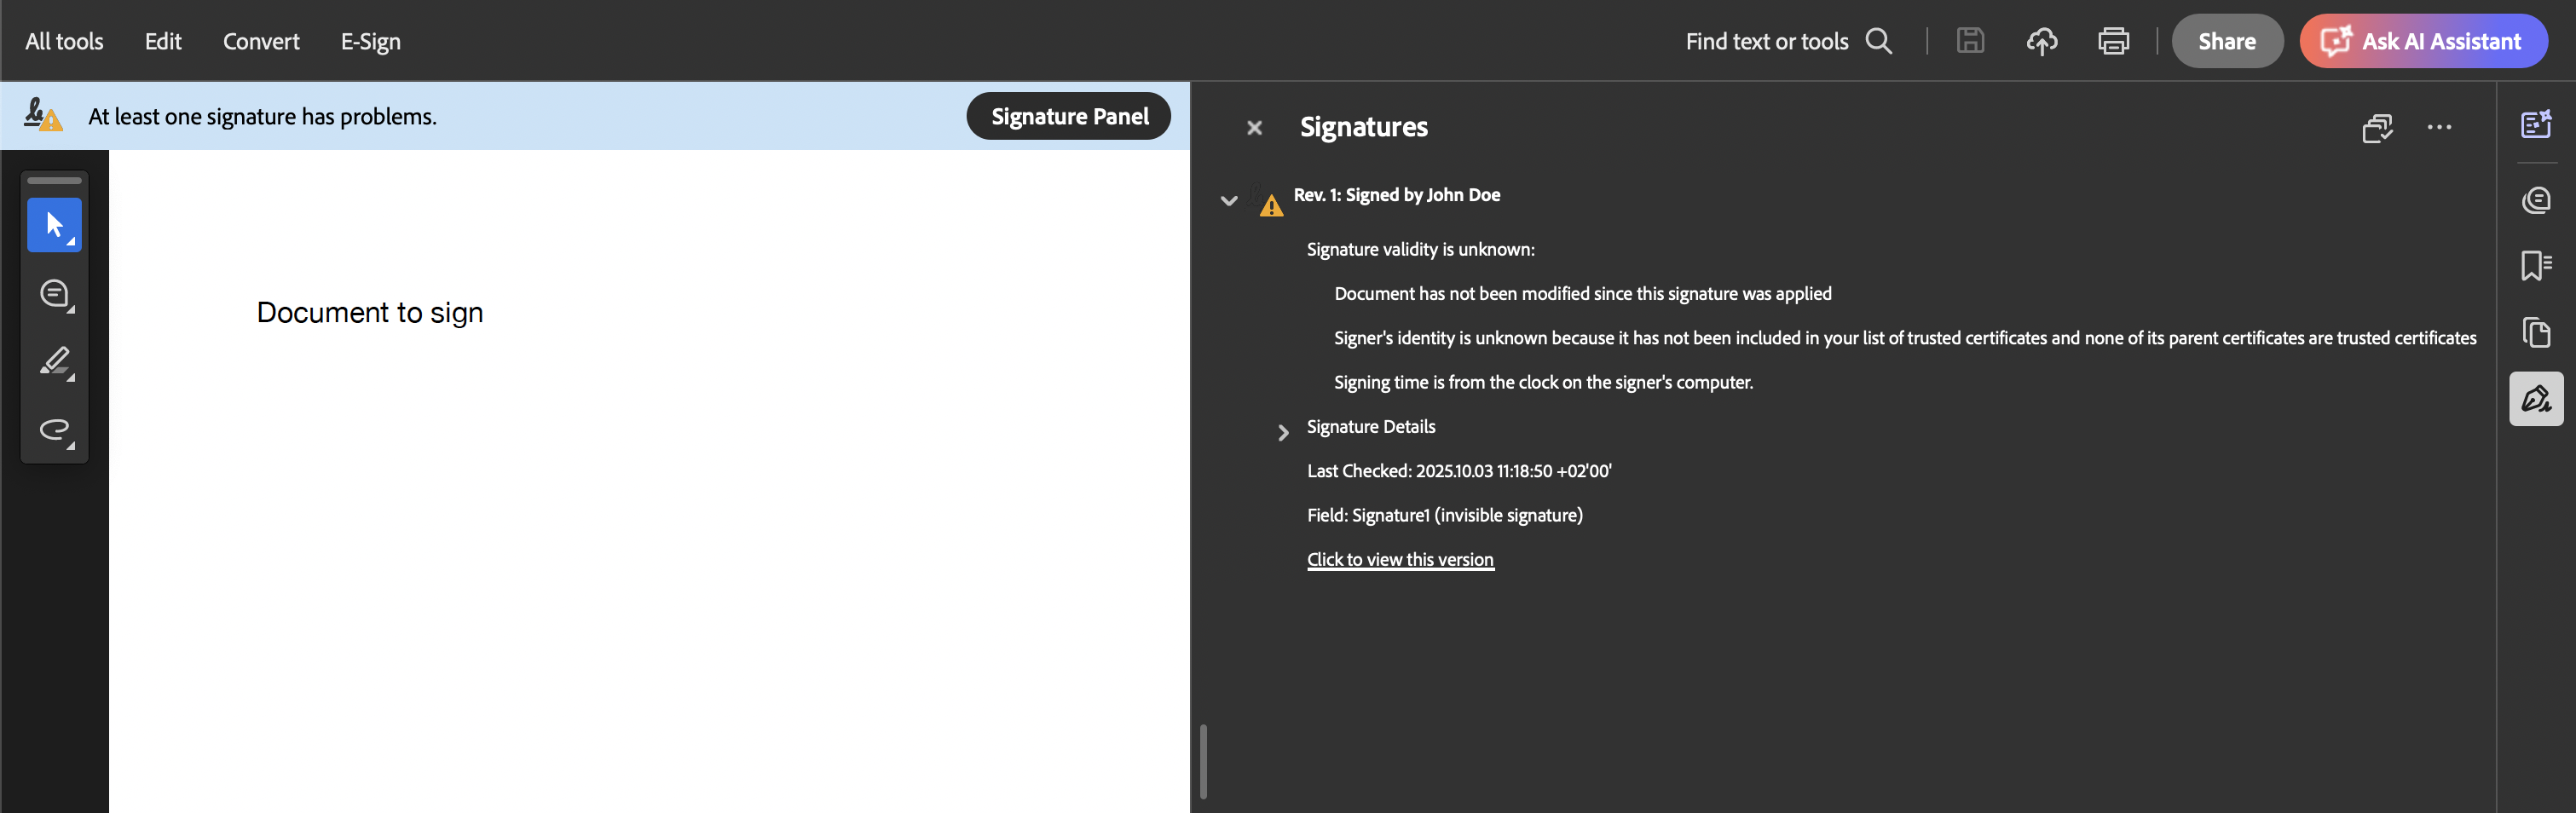
You can open the downloaded document in Adobe Acrobat Reader and see detail about the signature
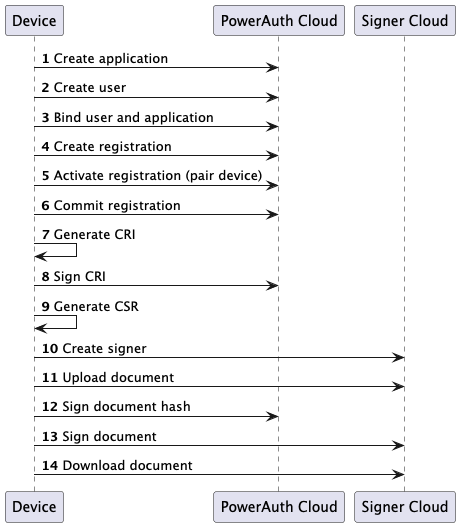
Cloud environment
This section describes how to sign a document in cloud environment with PowerAuth Cloud. Below is a sequence diagram of all the required steps.
| Component | URL |
|---|---|
| PowerAuth Cloud | https://powerauth.wultra.app/ |
| PowerAuth Enrollment Server | https://powerauth.wultra.app/enrollment-server |
| Signer Cloud | https://signer-cloud.wultra.app/ |
| EJBCA | https://ejbca.wultra.app/ |
The URLs in the table above are not real. They are used only for the purpose of this documentation.
Create a new application
Create a new application with name sc-demo-app in PowerAuth Cloud. For next REST API calls use Basic Authorization of your admin user.
curl -X 'POST' \
  'https://powerauth.wultra.app/admin/applications' \
  -H 'accept: */*' \
  -H 'Authorization: Basic <secret>'  \
  -H 'Content-Type: application/json' \
  -d '{
  "id": "sc-demo-app"
}'
An HTTP 200 OK response should be returned:
{
  "id": "sc-demo-app",
  "serviceBaseUrl": "https://powerauth.wultra.app/enrollment-server",
  "masterServerPublicKey": "BPn6ssyT5X+ia5u2DdUK0C/xZm87EXvJBqcQU/lOGh/r3KwhykGbxBePacS+iNgNxH1aiilRcGYueUsZFQ0OxLQ=",
  "appKey": "OI8IuYgjHNIzL45biwivDw==",
  "appSecret": "FKU2L3iyUu0h6G3MwAMqWQ==",
  "mobileSdkConfig": "ARA4jwi5iCMc0jMvjluLCK8PEBSlNi94slLtIehtzMADKlkBAUEE+fqyzJPlf6Jrm7YN1QrQL/FmbzsRe8kGpxBT+U4aH+vcrCHKQZvEF49pxL6I2A3EfVqKKVFwZi55SxkVDQ7EtA==",
  "roles": []
}
Prepare SDK config
Obtain the mobileSdkConfig of the created app to use the PowerAuth cmd tool:
{
  "applicationName": "sc-demo-app",
  "mobileSdkConfig": "ARA4jwi5iCMc0jMvjluLCK8PEBSlNi94slLtIehtzMADKlkBAUEE+fqyzJPlf6Jrm7YN1QrQL/FmbzsRe8kGpxBT+U4aH+vcrCHKQZvEF49pxL6I2A3EfVqKKVFwZi55SxkVDQ7EtA=="
}
Create a new user
Create a new sc-demo-user user in PowerAuth Cloud:
curl -X 'POST' \
  'https://powerauth.wultra.app/admin/users' \
  -H 'accept: */*' \
  -H 'Authorization: Basic <secret>' \
  -H 'Content-Type: application/json' \
  -d '{
  "username": "sc-demo-user"
}'
An HTTP 200 OK response should be returned:
{
  "username": "sc-demo-user",
  "password": "nMVPAQFZ4xqR9lP1m56reqaW",
  "enabled": true,
  "role": [
    "ROLE_USER"
  ],
  "applications": []
}
Bind user with application
Assign the user to the application:
curl -X 'POST' \
  'https://powerauth.wultra.app/admin/users/sc-demo-user/applications/sc-demo-app' \
  -H 'accept: */*' \
  -H 'Authorization: Basic <secret>' \
  -d ''
An HTTP 200 OK response should be returned:
{
  "username": "sc-demo-user",
  "enabled": true,
  "role": [
    "ROLE_USER"
  ],
  "applications": [
    "sc-demo-app"
  ]
}
Create registration
Create a new device registration request for the application sc-demo-app in PowerAuth Cloud.
For this and next REST API calls to the PowerAuth cloud, the newly created user must be authenticated. Use Basic authorization and the credentials from the Create a new user step.
This step and the next two steps (committing the operation as the last one) must be completed quickly, because by default there is only a short time window of a few minutes to finish the registration.
curl -X 'POST' \
  'https://powerauth.wultra.app/v2/registrations' \
  -H 'accept: */*' \
  -H 'Authorization: Basic c2MtZGVtby11c2VyOm5NVlBBUUZaNHhxUjlsUDFtNTZyZXFhVw==' \
  -H 'Content-Type: application/json' \
  -d '{
  "userId": "sc-demo-user",
  "appId": "sc-demo-app"
}'
An HTTP 200 OK response should be returned:
{
  "activationQrCodeData": "AN7LW-EPNVO-E4KFV-WPEKQ#MEUCIDMt+l3s3dqLcvJ2jUe1XdYL3X7Ng5WD9Q8dF9rkxBKwAiEA8EY0B3+U3z/3yOfIG5bbAariaH7lTlrMoEkEwNT+FJo=",
  "activationCode": "AN7LW-EPNVO-E4KFV-WPEKQ",
  "activationCodeSignature": "MEUCIDMt+l3s3dqLcvJ2jUe1XdYL3X7Ng5WD9Q8dF9rkxBKwAiEA8EY0B3+U3z/3yOfIG5bbAariaH7lTlrMoEkEwNT+FJo=",
  "registrationId": "0a23495a-b159-4d06-ad4c-5a832c305605"
}
Register device
Register your “device” via PowerAuth cmd tool. The --url is serviceBaseUrl from response when application was created.
java -jar powerauth-java-cmd-2.0.0-SNAPSHOT.jar \
    --url "https://powerauth.wultra.app/enrollment-server" \
    --status-file "./device_status.json" \
    --config-file "./sdk_config.json" \
    --method "create" \
    --password "1234" \
    --version "3.3" \
    --activation-code "AN7LW-EPNVO-E4KFV-WPEKQ"
This command creates device_status.json which works as your “device”:
{
  "transportMasterKey" : "926CErfSGP5Nr6NYmQZ/Mg==",
  "activationId" : "0a23495a-b159-4d06-ad4c-5a832c305605",
  "ecServerPublicKey" : "BGjmwSWh5hhlsb8iDTEk0gnWgjndUoWTJHXJfd7ZaFFjKgYqn7QTcRIZ6wOtfa8QFE2CX7bNZsy0zAJVoQeO9yo=",
  "possessionFactorKey" : "A6QRdAYciZNBJtbUWsutHw==",
  "knowledgeFactorKeySalt" : "QyNkVNms1qmFnPC51PPesQ==",
  "knowledgeFactorKeyEncrypted" : "R9OV/yZiov7Il9CwXMJnMA==",
  "ctrData" : "1km4WNRJ2+F5B9ahM6H/7Q==",
  "counter" : 7,
  "encryptedEcDevicePrivateKey" : "NApO4o4ntUEn6eexw6Fq0aLm6QMasG0rw88zfPd2RGzlqNq1Aq3iPeVy7qm8JZej",
  "ecDevicePublicKey" : "BIdOr9YveWTz0mTkheqfsqXxzvOzBUxKGj40ucHA6iP1OKfkFaTinm4fh9d3aVyiWh3TEpPaPW9RTlLomdcduRs=",
  "biometryFactorKey" : "8Z0+Qq3akIWXFtcRmYc7UA==",
  "sharedSecretAlgorithm" : "EC_P256",
  "version" : 3
}
Commit registration
As the last step, commit the registration. The activationId can be found in device_status.json or in the command output.
Be careful—this is a different value from the activationCode.
curl -X 'POST' \
  'https://powerauth.wultra.app/v2/registrations/0a23495a-b159-4d06-ad4c-5a832c305605/commit' \
  -H 'accept: */*' \
  -H 'Authorization: Basic c2MtZGVtby11c2VyOm5NVlBBUUZaNHhxUjlsUDFtNTZyZXFhVw==' \
  -H 'Content-Type: application/json' \
  -d '{
}'
Generate CRI
Use code from Java code for generating CRI.
Set value of PUBLIC_KEY_BASE64 constant to ecDevicePublicKey from the device_status.json file:
private static final String PUBLIC_KEY_BASE64 = "BIdOr9YveWTz0mTkheqfsqXxzvOzBUxKGj40ucHA6iP1OKfkFaTinm4fh9d3aVyiWh3TEpPaPW9RTlLomdcduRs=";
When you have the CRI, save it into cri.pem file as bytes:
echo "MIGYAgEAMDYxETAPBgNVBAMMCEpvaG4gRG9lMRQwEgYDVQQKDAtFeGFtcGxlQ29ycDELMAkGA1UEBhMCVVMwWTATBgcqhkjOPQIBBggqhkjOPQMBBwNCAASHTq/WL3lk89Jk5IXqn7Kl8c7zswVMSho+NLnBwOoj9Tin5BWk4p5uH4fXd2lcolod0xKT2j1vUU5S6JnXHbkboAA=" | base64 --decode > cri.der
Sign CRI
Sign the CRI via PowerAuth cmd tool:
java -jar powerauth-java-cmd-2.0.0-SNAPSHOT.jar \
    --url "https://powerauth.wultra.app/enrollment-server" \
    --status-file "./device_status.json" \
    --config-file "./sdk_config.json" \
    --method "sign-asymmetric" \
    --auth-code-type "possession_knowledge" \
    --data-file "cri.der" \
    --version "3.3" \
    --password "1234"
The signature is value of signature field from command line output:
"signature" : "MEYCIQDQZ0kbxn1L/3xQxqno4ARZr+G6arz+ff+uXZxn0s4UnQIhAMIeqnvEyMwNujirKtftG572mKWsdc5nD1gQ/y4XXdEj"
Create CSR
Use code in Java code for generating CSR.
Adjust values of CRI_BASE_64 and SIGNATURE_BASE64 constants obtained in previous steps:
private static final String CRI_BASE_64 = "MIGYAgEAMDYxETAPBgNVBAMMCEpvaG4gRG9lMRQwEgYDVQQKDAtFeGFtcGxlQ29ycDELMAkGA1UEBhMCVVMwWTATBgcqhkjOPQIBBggqhkjOPQMBBwNCAASHTq/WL3lk89Jk5IXqn7Kl8c7zswVMSho+NLnBwOoj9Tin5BWk4p5uH4fXd2lcolod0xKT2j1vUU5S6JnXHbkboAA=";
private static final String SIGNATURE_BASE64 = "MEYCIQDQZ0kbxn1L/3xQxqno4ARZr+G6arz+ff+uXZxn0s4UnQIhAMIeqnvEyMwNujirKtftG572mKWsdc5nD1gQ/y4XXdEj";
Create signer
When you have CSR, you can create a signer in Signer Cloud by calling following endpoint.
The externalSignerId is activationId, userId can be any random value and the csr was obtained in previous step. It is already in correct format.
Any call to the Signer Cloud must contain proper authorization. See Signer Cloud Authorization.
curl --location 'https://signer-cloud.wultra.app/signers' \
--header 'Content-Type: application/json' \
--header 'Authorization: Bearer <TOKEN>' \
--data '{
    "externalSignerId" : "0a23495a-b159-4d06-ad4c-5a832c305605",
    "userId" : "sc-demo-user",
    "csr": "-----BEGIN CERTIFICATE REQUEST-----\nMIHyMIGYAgEAMDYxETAPBgNVBAMMCEpvaG4gRG9lMRQwEgYDVQQKDAtFeGFtcGxl\nQ29ycDELMAkGA1UEBhMCVVMwWTATBgcqhkjOPQIBBggqhkjOPQMBBwNCAASHTq/W\nL3lk89Jk5IXqn7Kl8c7zswVMSho+NLnBwOoj9Tin5BWk4p5uH4fXd2lcolod0xKT\n2j1vUU5S6JnXHbkboAAwCgYIKoZIzj0EAwIDSQAwRgIhAKSykwJ0ef+rmtsS1RbV\nuLMDLACN/eL4iSR+2R+udH/cAiEA4PAPzYU2S3m5oMLWhLlx5db3HiI8o+rsctLb\n/7kH5d8=\n-----END CERTIFICATE REQUEST-----\n"
}'
An HTTP 200 OK response should be returned
Upload document for signing
Upload the document you want to sign. The values for externalId and name can be arbitrary.
Visual signature can be added as optional parameter. See Document Visual Signature.
curl --location 'https://signer-cloud.wultra.app/documents' \
--header 'Authorization: Bearer <TOKEN>' \
--form 'externalSignerId="0a23495a-b159-4d06-ad4c-5a832c305605"' \
--form 'externalId="external-id-example"' \
--form 'name="Document example"' \
--form 'file=@"<FILE_PATH>"'
An HTTP 200 OK response should be returned:
{
    "documentId": "d8a06ea4-e9c8-4f0c-ac22-c009a1f351b5",
    "externalSignerId": "0a23495a-b159-4d06-ad4c-5a832c305605",
    "externalId": "external-id-example",
    "name": "Document example",
    "fileName": "input.pdf",
    "size": 7757,
    "hash": "MYG2MBgGCSqGSIb3DQEJAzELBgkqhkiG9w0BBwEwLwYJKoZIhvcNAQkEMSIEIDjaW5HYNxwEDsi5/frhcx8k/DBC4o0ngYaLqKI6MS//MGkGCyqGSIb3DQEJEAIvMVowWDBWMFQEIBco05OSwhsoq1BOh2Yxsrw5OarRAQOexhk3jLCQiRvBMDAwGKQWMBQxEjAQBgNVBAMMCUlzc3VpbmdDQQIUdgfxsvHbkb+D10cB0tlVop1pxBw="
}
Sign document hash
Retrieve the value of hash from the response in the previous step and save it as bytes in a file named hash.bin:
echo "MYG2MBgGCSqGSIb3DQEJAzELBgkqhkiG9w0BBwEwLwYJKoZIhvcNAQkEMSIEIDjaW5HYNxwEDsi5/frhcx8k/DBC4o0ngYaLqKI6MS//MGkGCyqGSIb3DQEJEAIvMVowWDBWMFQEIBco05OSwhsoq1BOh2Yxsrw5OarRAQOexhk3jLCQiRvBMDAwGKQWMBQxEjAQBgNVBAMMCUlzc3VpbmdDQQIUdgfxsvHbkb+D10cB0tlVop1pxBw=" | base64 --decode > hash.bin
Now sign the hash via PowerAuth cmd tool:
java -jar powerauth-java-cmd-2.0.0-SNAPSHOT.jar \
    --url "https://powerauth.wultra.app/enrollment-server" \
    --status-file "./device_status.json" \
    --config-file "./sdk_config.json" \
    --method "sign-asymmetric" \
    --auth-code-type "possession_knowledge" \
    --data-file "hash.bin" \
    --version "3.3" \
    --password "1234"
You can find the signature in signature field in output:
"signature" : "MEUCIQC4K+g3kluK8KEMAXitVLGatjRVXZMF5OjxLoU0MzBspwIge1SOPpGXaiGU0933uO+NAnu5+2uIsI9Dxco5LZine00="
Sign the document
Use the signature value from previous step and documentId in path from document upload response:
curl --location 'https://signer-cloud.wultra.app/documents/d8a06ea4-e9c8-4f0c-ac22-c009a1f351b5/signature' \
--header 'Content-Type: application/json' \
--header 'Authorization: Bearer <TOKEN>' \
--data '{
    "signature": "MEUCIQC4K+g3kluK8KEMAXitVLGatjRVXZMF5OjxLoU0MzBspwIge1SOPpGXaiGU0933uO+NAnu5+2uIsI9Dxco5LZine00="
}'
An HTTP 200 OK response should be returned:
{
    "documentId": "d8a06ea4-e9c8-4f0c-ac22-c009a1f351b5",
    "uri": "https://signer-cloud.wultra.app/documents/d8a06ea4-e9c8-4f0c-ac22-c009a1f351b5/download"
}
If you want to add a timestamp from a TSA (Time Stamping Authority) server, please see Document Signature Level.
Download signed document
Use same documentId in path as in previous step:
curl --location 'http://127.0.0.1:8090/documents/d8a06ea4-e9c8-4f0c-ac22-c009a1f351b5/file' \
--header 'Authorization: Bearer <TOKEN>'
You can open the downloaded document in Adobe Acrobat Reader and see detail about the signature
Appendix
Here are a few utility Java code. All can be executed online on https://www.jdoodle.com/online-java-compiler.
You have to add following libraries:
org.bouncycastle:bcprov-jdk18on:1.82org.bouncycastle:bcpkix-jdk18on:1.82
And copy code. Here is example for generating CRI:
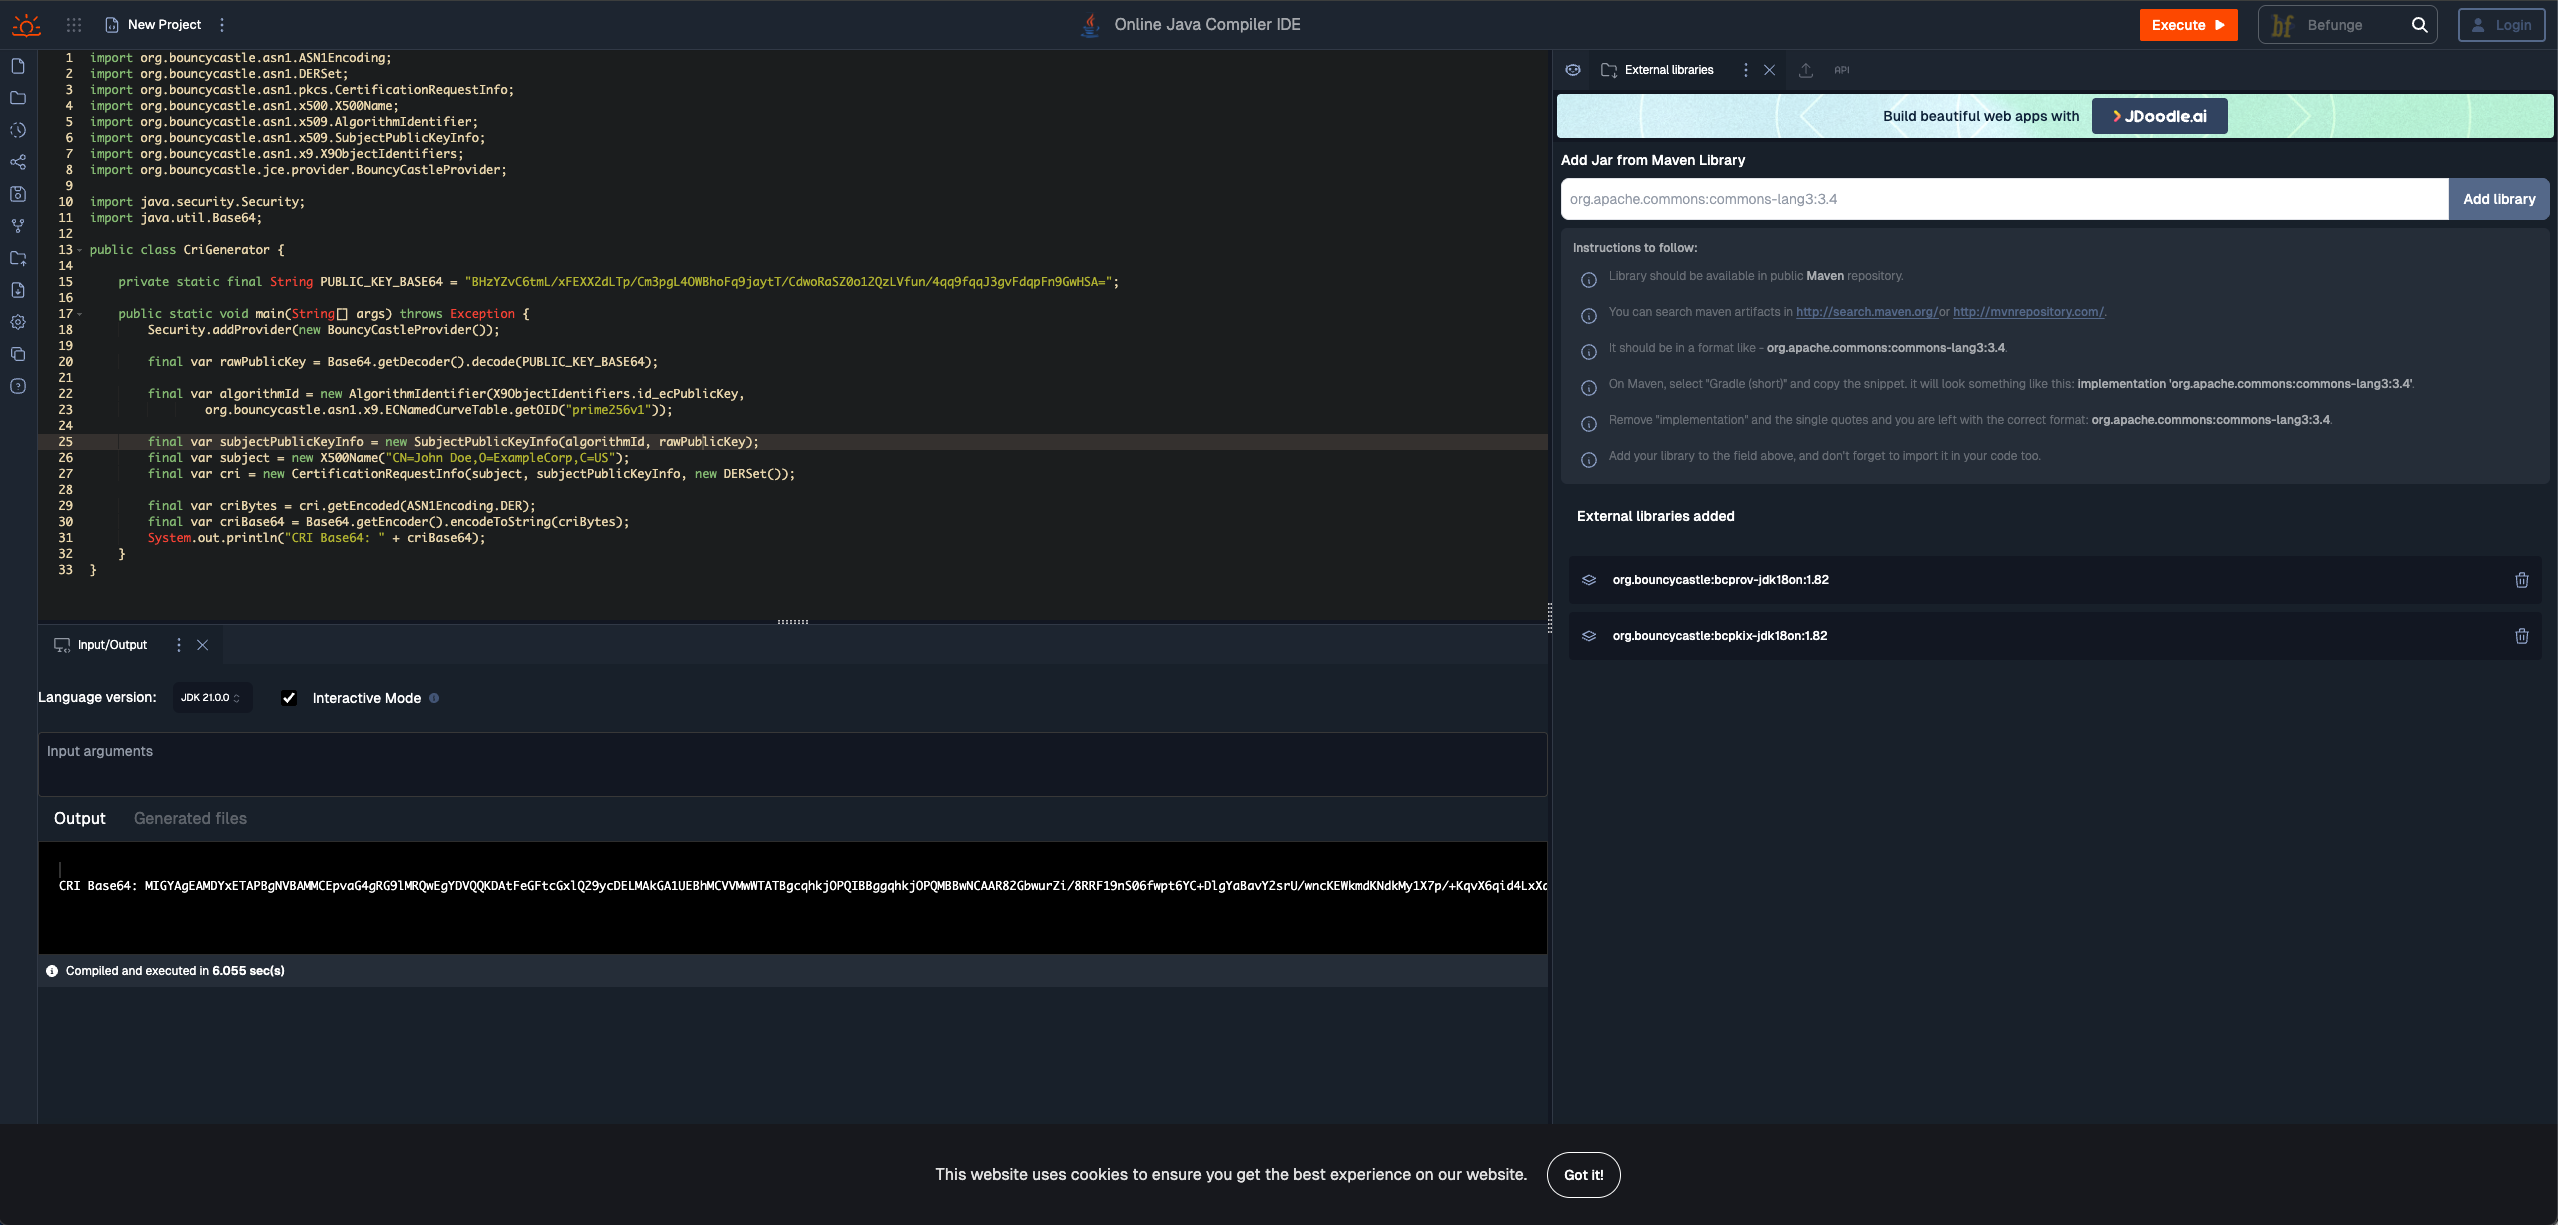
Java code for generating CRI
Following code generates CRI for given public key and prints it in base64 format.
Set your public key into constant PUBLIC_KEY_BASE64.
import org.bouncycastle.asn1.*;
import org.bouncycastle.asn1.pkcs.Attribute;
import org.bouncycastle.asn1.pkcs.PKCSObjectIdentifiers;
import org.bouncycastle.asn1.pkcs.CertificationRequestInfo;
import org.bouncycastle.asn1.x500.X500Name;
import org.bouncycastle.asn1.x509.*;
import org.bouncycastle.asn1.x9.X9ObjectIdentifiers;
import org.bouncycastle.jce.provider.BouncyCastleProvider;

import java.io.IOException;
import java.security.Security;
import java.util.Base64;

public class CriGenerator {

    private static final String OID = "prime256v1";
    private static final String X500_NAME = "CN=John Doe,O=ExampleCorp,C=US";
    private static final String PUBLIC_KEY_BASE64 = "BHzYZvC6tmL/xFEXX2dLTp/Cm3pgL4OWBhoFq9jaytT/CdwoRaSZ0o12QzLVfun/4qq9fqqJ3gvFdqpFn9GwHSA=";

    public static void main(String[] args) throws IOException {
        Security.addProvider(new BouncyCastleProvider());

        final var rawPublicKey = Base64.getDecoder().decode(PUBLIC_KEY_BASE64);

        final var algorithmId = new AlgorithmIdentifier(
                X9ObjectIdentifiers.id_ecPublicKey,
                org.bouncycastle.asn1.x9.ECNamedCurveTable.getOID(OID));

        final var subject = new X500Name(X500_NAME);
        final var subjectPublicKeyInfo = new SubjectPublicKeyInfo(algorithmId, rawPublicKey);

        // call buildAttributes(); if you want to add certificate extension attributes according to RFC 5280
        final var attributes = new DERSet();

        final var cri = new CertificationRequestInfo(subject, subjectPublicKeyInfo, attributes);

        final var criBytes = cri.getEncoded(ASN1Encoding.DER);
        final var criBase64 = Base64.getEncoder().encodeToString(criBytes);
        System.out.println("CRI Base64: " + criBase64);
    }

    private static DERSet buildAttributes() throws IOException {
        final var otherNameOid = new ASN1ObjectIdentifier("1.3.6.1.4.1.311.20.2.3");
        final var otherNameValue = new DERUTF8String("[email protected]");

        final var otherNameVector = new ASN1EncodableVector();
        otherNameVector.add(otherNameOid);
        otherNameVector.add(new DERTaggedObject(true, 0, otherNameValue));

        final var otherName = new GeneralName(GeneralName.otherName, new DERSequence(otherNameVector));

        // Subject Alternative Name (SAN)
        final var san = new GeneralNames(otherName);
        final var sanExtension = new Extension(Extension.subjectAlternativeName, false, san.getEncoded());

        final var extensions = new Extensions(sanExtension);
        final var extensionRequest = new Attribute(PKCSObjectIdentifiers.pkcs_9_at_extensionRequest, new DERSet(extensions));
        return new DERSet(extensionRequest);
    }
}
Printed output:
CRI Base64: MIGYAgEAMDYxETAPBgNVBAMMCEpvaG4gRG9lMRQwEgYDVQQKDAtFeGFtcGxlQ29ycDELMAkGA1UEBhMCVVMwWTATBgcqhkjOPQIBBggqhkjOPQMBBwNCAAR82GbwurZi/8RRF19nS06fwpt6YC+DlgYaBavY2srU/wncKEWkmdKNdkMy1X7p/+KqvX6qid4LxXaqRZ/RsB0goAA=
Java code for generating CSR
Following code generates CSR for given CRI and signature and prints it in PEM format.
Set CRI value into CRI_BASE_64 and signature into SIGNATURE_BASE64. Both in base64 format.
import org.bouncycastle.asn1.ASN1Encoding;
import org.bouncycastle.asn1.ASN1Primitive;
import org.bouncycastle.asn1.DERBitString;
import org.bouncycastle.asn1.pkcs.CertificationRequest;
import org.bouncycastle.asn1.pkcs.CertificationRequestInfo;
import org.bouncycastle.asn1.x509.AlgorithmIdentifier;
import org.bouncycastle.asn1.x9.X9ObjectIdentifiers;
import org.bouncycastle.jce.provider.BouncyCastleProvider;

import java.security.Security;
import java.util.Base64;

public class CsrGenerator {

    private static final String CRI_BASE_64 = "MIGYAgEAMDYxETAPBgNVBAMMCEpvaG4gRG9lMRQwEgYDVQQKDAtFeGFtcGxlQ29ycDELMAkGA1UEBhMCVVMwWTATBgcqhkjOPQIBBggqhkjOPQMBBwNCAAR82GbwurZi/8RRF19nS06fwpt6YC+DlgYaBavY2srU/wncKEWkmdKNdkMy1X7p/+KqvX6qid4LxXaqRZ/RsB0goAA=";
    private static final String SIGNATURE_BASE64 = "MEUCIFM/zV52N+WM6kHVzJePDAKYNkKxmHIK5Ywx/QWnB9S6AiEA3QlITRs/sPyjT/iVPWKXPRUcLfERqk/Ph2LzUQczH4k=";

    public static void main(String[] args) throws Exception {
        Security.addProvider(new BouncyCastleProvider());

        final var criBytes = Base64.getDecoder().decode(CRI_BASE_64);
        final var cri = CertificationRequestInfo.getInstance(ASN1Primitive.fromByteArray(criBytes));

        final var signatureBytes = Base64.getDecoder().decode(SIGNATURE_BASE64);
        final var derBitString = new DERBitString(signatureBytes);

        final var signatureAlgorithm = new AlgorithmIdentifier(X9ObjectIdentifiers.ecdsa_with_SHA256);

        final var csr = new CertificationRequest(cri, signatureAlgorithm, derBitString);

        final var csrDer = csr.getEncoded(ASN1Encoding.DER);
        String pem = "-----BEGIN CERTIFICATE REQUEST-----\n"
                + Base64.getMimeEncoder(64, "\n".getBytes()).encodeToString(csrDer)
                + "\n-----END CERTIFICATE REQUEST-----\n";

        System.out.println("CSR PEM Base64:");
        System.out.println(pem);
    }
}
Printed output:
CSR PEM Base64:-----BEGIN CERTIFICATE REQUEST-----\nMIHxMIGYAgEAMDYxETAPBgNVBAMMCEpvaG4gRG9lMRQwEgYDVQQKDAtFeGFtcGxl\nQ29ycDELMAkGA1UEBhMCVVMwWTATBgcqhkjOPQIBBggqhkjOPQMBBwNCAAR82Gbw\nurZi/8RRF19nS06fwpt6YC+DlgYaBavY2srU/wncKEWkmdKNdkMy1X7p/+KqvX6q\nid4LxXaqRZ/RsB0goAAwCgYIKoZIzj0EAwIDSAAwRQIgUz/NXnY35YzqQdXMl48M\nApg2QrGYcgrljDH9BacH1LoCIQDdCUhNGz+w/KNP+JU9Ypc9FRwt8RGqT8+HYvNR\nBzMfiQ==\n-----END CERTIFICATE REQUEST-----\n
Signer Cloud Authorization
Any REST API call to Signer Cloud must be authorized.
Basic
In case of BASIC_HTTP, which is used only for local development, username is always user and password is random UUID printed into log when application is started.
In log look for message Using generated security password: 485f43aa-658e-44a5-9978-fce8b9936435;
OAuth2
In case of OAUTH2, which should be always used, you must get a token. Example of such call:
curl -X POST "https://wultra.app/oauth2/v2.0/token" \
  -H "Content-Type: application/x-www-form-urlencoded" \
  --data-urlencode "client_id=<CLIENT_ID>" \
  --data-urlencode "client_secret=<CLIENT_SECRET>" \
  --data-urlencode "scope=<SCOPE>" \
  --data-urlencode "grant_type=client_credentials"
Document signature level
By default, the PAdES B-B (Baseline-Basic) level is used for signatures. Another supported level is PAdES B-T (Baseline-Timestamp).
To use it, make sure you set the TSA URL in the configuration property signer-cloud.server.pades.tsa-url.
Then, you can include the signatureLevel value in the request body when calling the document signing endpoint.
Example of full request body:
{
  "signature": "MEUCIQCEqNu5SfHvjAhNOLsJwLGa1rukhrA9pxWJAlHBxYKcMwIgVlmo5LVod6vscliVnyaB/C3wTsh+4lghdJR4YsWVBdc=",
  "signatureLevel" : "PADES_B_T"
}
Document visual signature
When a document is uploaded, there is an optional visualSignature parameter for defining the visual signature in the signed document.
Cloud Signer simply mimics DSS PAdES parameters. More information about the available values can be found here.
Example of JSON visual signature definition:
{
    "image": "iVBORw0KGgoAAAANSUhEUgAAAAEAAAABCAQAAAC1HAwCAAAAC0lEQVR4nGNgYAAAAAMAAWgmWQ0AAAAASUVORK5CYII=",
    "alignmentHorizontal": "CENTER",
    "alignmentVertical": "MIDDLE",
    "zoom": 100,
    "backgroundColor": "#4f4e4d",
    "imageScaling": "CENTER",
    "fieldParameters": {
        "fieldId": null,
        "page": 1,
        "originX": 150,
        "originY": 400,
        "width": 250,
        "height": 100,
        "rotation": "AUTOMATIC"
    },
    "textParameters": {
        "text": "John Doe",
        "textColor": "#ffffff",
        "backgroundColor": "#090cbd",
        "padding": 10,
        "textWrapping": "FILL_BOX_AND_LINEBREAK",
        "signerTextPosition": "RIGHT",
        "signerTextHorizontalAlignment": "CENTER",
        "signerTextVerticalAlignment": "MIDDLE",
        "standard14Font": "COURIER_OBLIQUE",
        "customFont": null
    }
}