Device Setup
Language and PIN setup
The initial setup is a prerequisite ensuring that the device is securely set up and ready to be used. During this process, the device is configured, personalized (e.g., language selection), and protected by a user-defined PIN, which serves as an authentication factor for confirming operations. Once completed, the device enters its default state and is prepared to handle authentication and transaction signing requests.
User Journey
Steps
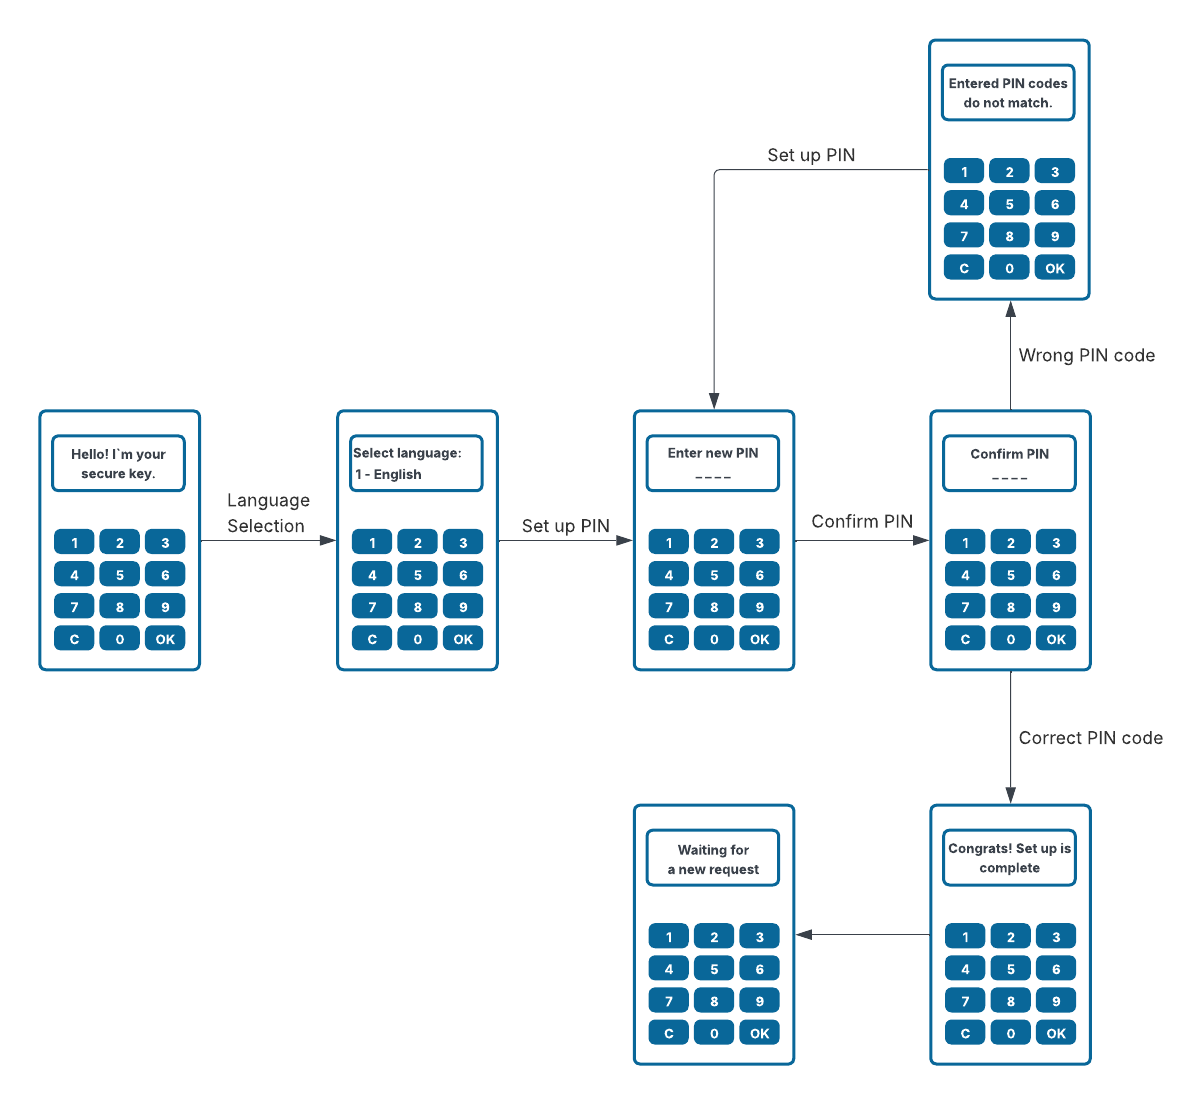
- Connect the device to the computer using the USB data cable. The device will turn on automatically, and when you launch it for the first time, you should see the following screen:
Hello! I`m your secure key. - After 3 seconds, the screen will switch to the language selection screen. Select an option from menu using the corresponding number. The language can be changed later in the device settings.
- Set up the device PIN, which you will use to confirm operations. You will be required to enter the PIN twice. If you enter the second PIN incorrectly, the device will display an error message, and you will need to repeat the PIN setup process.
- After successfully setting the PIN code, you will see the following screen:
Congrats! Setup is complete. - After 3 seconds, the device will return to its default state and wait for input. Depending on your bank, you may need to complete the device activation at a branch or via online banking. The default state on the device looks like this:
Waiting for a new request.
Do not share your PIN code with anyone, it is your device password.
You set the PIN only for this device; you will not be asked to enter it anywhere else, nor will anyone from a bank or other organization ask you for it. Please note that if you forget your PIN, you will need to reset the entire device; it is not possible to have it sent to you later.
Service Registration
Registration involves generating a public-private key pair for a particular website or service, and registering the device on the FIDO2 server.
If PowerAuth Cloud is used as the FIDO2 server, this process is known as Device Registration (or sometimes Device Activation).
User Journey

Steps
- Initiate the process on the computer.
- A notification for adding a new service will appear on the screen. Proceed by pressing the “OK” button.
- A notification about the name of the service is shown. Proceed by pressing the “OK” button.
- A notification about the user is shown - press the “OK” button.
- Enter PIN.
- After a few seconds of processing the success screen with the text below is shown.
The service has been added.
Integration

Steps
- The user clicks the “Register” button in the web browser.
- The web browser requests a registration challenge from the WebAuthn component.
- The WebAuthn component retrieves the registration challenge from the FIDO2 server and returns it to the browser.
- The browser forwards the challenge to the user’s Talisman authenticator.
- The Talisman prompts the user for an authorization gesture (PIN entry).
- After successful authorization, the Talisman creates a new key pair and signs the challenge.
- The signed challenge together with the credential data is sent from the browser to the WebAuthn component.
- The WebAuthn component forwards the data to the FIDO2 server to register the authenticator.
- The FIDO2 server validates the data and confirms successful registration.
- The system confirms that the user has been successfully registered (and optionally logged in).
Device Setting
From the default screen, you can access the settings menu by pressing and holding the “C” button for 3 seconds. The Talisman menu contains 5 options. You can select an option by pressing the corresponding number:
- 1 - Language: select the device language.
- 2 - Change PIN: change the PIN code.
- 3 - Delete service: select the service to delete.
- 4 - Show version: displays the token version on the screen.
- 5 - Erase device: erases the entire Talisman token.
For the following actions: “Change PIN”, “Delete service” and “Erase device”, you will need to enter the PIN code.