Product Overview
At Wultra, our Digital Onboarding solution seamlessly integrates the best ID verification and identification components directly into the customer’s identity creation process, providing a fully end-to-end digital experience. This approach enables our clients to implement the solution within their existing architecture or with their current technology vendor, without incurring unnecessary costs.
Leveraging top technologies and adapting to regulatory changes, Wultra delivers a modern and secure experience that meets AML and KYC requirements. It also strengthens protection against phishing and vishing by removing manual code entry, preventing attackers from taking over the targeted mobile app.
Key features include:
- Straightforward document scanning process, supported by real-time error messaging for optimal document positioning and document verification.
- Advanced face matching and liveness detection capabilities.
- SDK’s backed process, including identifying fake IDs and virtual camera usage.
- Full compliance with local regulations.
The solution supports use cases of new customer digital onboarding via ID document OCR and verification combined with facial biometrics, mobile application activation, seamless access recovery via facial biometrics, or authentication step-up for high-value/high-risk transactions via facial biometrics.
To allow for an easy solution management and user activity lookup (i.e., lookup of the scanned documents, results of facial verification, or results of operation approvals), we include an online back-office app available via a desktop web interface.
All components are available as a SaaS or can be deployed on-premise, except for the facial biometrics solution, which greatly benefits from running in the cloud, allowing easy adoption of new attack vectors and continuous improvements in face verification.
High-Level Architecture

The proposed solution features an integrated platform that combines the best of security, document scanning and verification, and intuitive biometric verification.
Mobile Libraries
Digital Onboarding SDK
The SDK communicates with the Onboarding Server to execute process steps and provide process status so the mobile application can execute the proper screen flow. The SDK has a React Native bridge.
PowerAuth SDK
Currently used SDK for PowerAuth Mobile-First Authentication. The onboarding process activates the SDK. Also, it uses this SDK to add an additional layer of protection for data transferred between the mobile application and the backend servers. SDK has a React Native bridge.
Document Verification SDK
The React Native SDK itself doesn’t need backend servers to execute the extraction but conveniently scans the document and is also capable of providing local data extraction, so it could be in the screen flow to double-check data before sending the captured document scan to the backend for verification.
Liveness Check SDK
The React Native SDK captures the user’s face and sends the resulting image to the cloud API for verification. Communication can be optionally made via bank infrastructure using a reverse proxy. The SDK immediately provides the verification result by scanning, which could be used for screen flow management. From a security point of view, the verification result is read on the backend from the cloud API.
Backend Components
PowerAuth Cloud
This core PowerAuth component provides services for device enrollment and operations authentication in compliance with PSD2 requirements for Strong Customer Authentication.
Onboarding Server
This extended PowerAuth component serves as a connector for a mobile application. It allows the orchestration of the onboarding process on the mobile application. Based on PowerAuth’s cryptographic features, the component guarantees process and data integrity.
Liveness Check Proxy
Optional Component. The Liveness Check Proxy is used in cases when user liveness verification is not part of the onboarding or recovery flows, such as authentication step-ups.
Document Check Proxy
Optional component. The Document Check Proxy serves for cases when documents should be verified (or just extracted) outside the onboarding or recovery flows. For example, a user should upload a newly issued document when the old one expires.
User Data Store
Optional component. User Data Store is a Wultra default component for storing verified documents. This can speed up integration when the bank doesn’t have such a component ready. The component also serves as a default document storage used by the Liveness Check Proxy and Document Check Proxy.
Providers API
The Document Verification and Presence Check are provided by the Service Providers.
Business Architecture
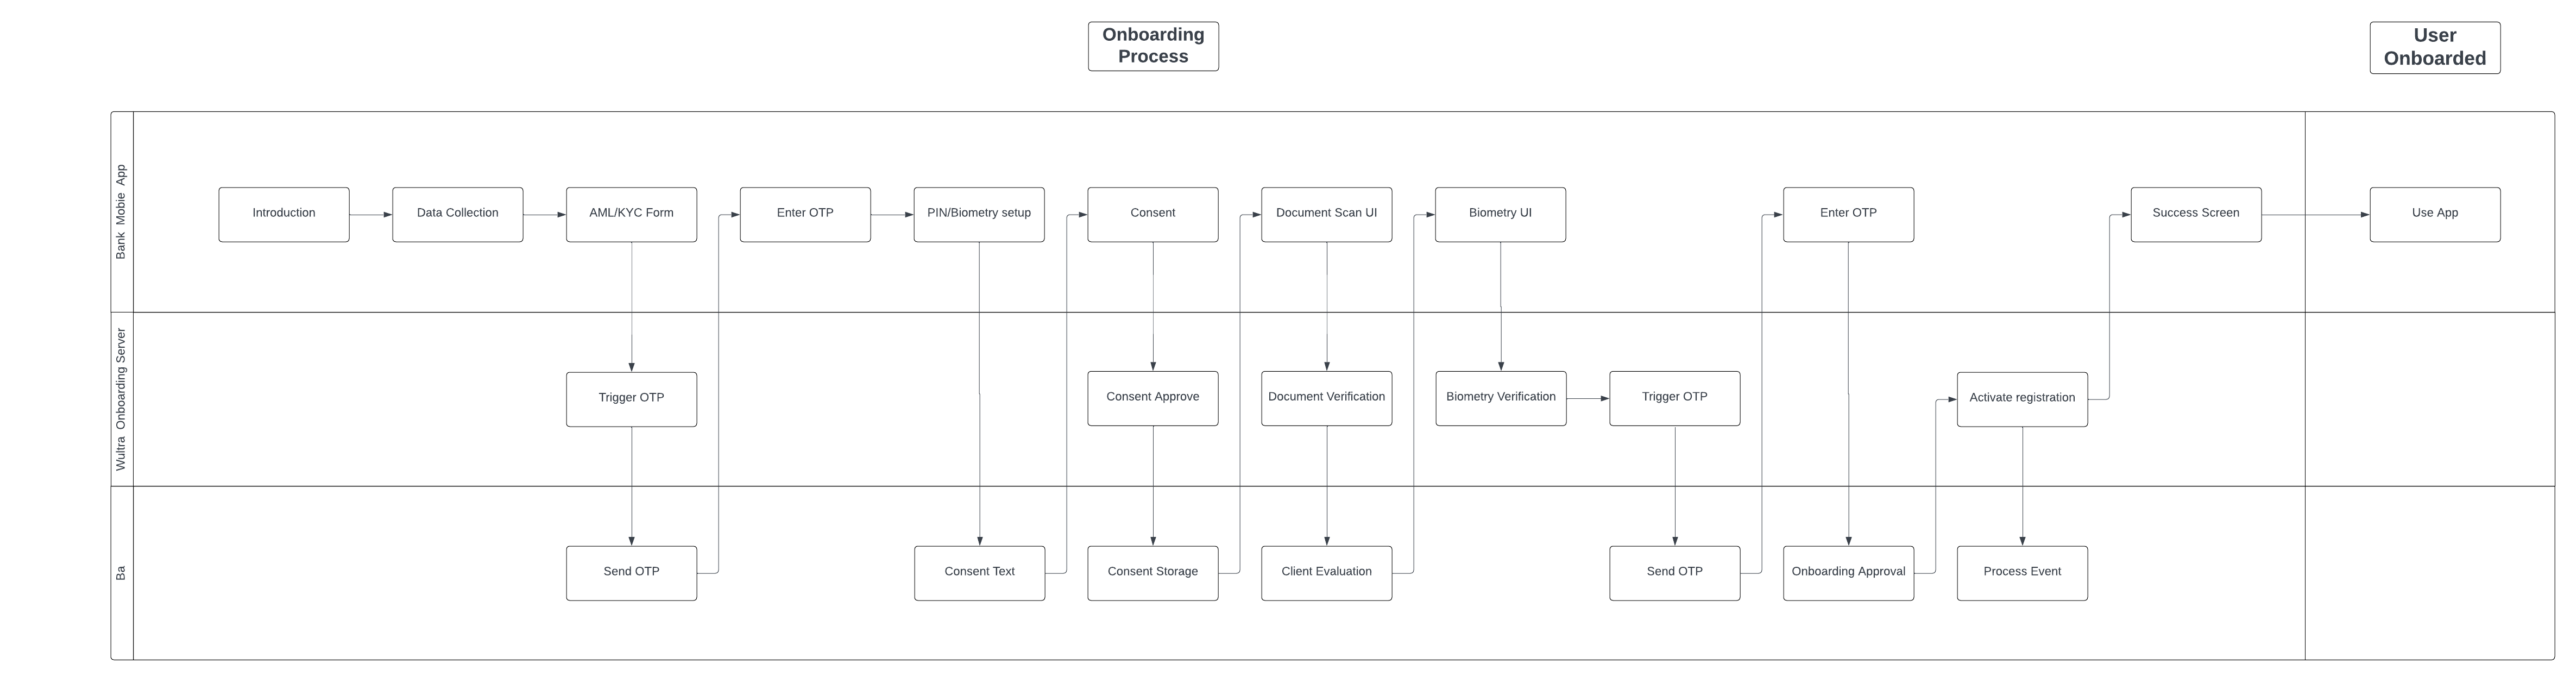
Onboarding Process Diagram
Wultra implements the critical process of onboarding, which is provided on the mobile platform by Wultra’s SDK:
- SDK will be integrated into the existing providers application and provide onboarding and Strong Customer Authentication (SCA) on the device. The whole onboarding process is designed as a mobile only.
The user journey is presented in the diagram below.
The digital onboarding process consists of a set of checks and validations in a flow designed to maximize the conversion rate while keeping up with regulatory (KYC and AML) and internal security requirements.
The user journey can be amended and will be finalized during the analysis phase.
Onboarding State Diagram
Activating a new mobile application (e.g., an existing customer with a new phone) uses the same core components of ID scanning and verification and liveness detection. In this scenario, the components are combined to check an existent identity and are typically combined with SMS OTP.
It’s important to note that Digital Onboarding boosts security by:
- Adding a step that cannot be phished out easily - while the user can pass it easily, there’s no information the user gives away to the attacker.
- Capturing the photo of a person using the device on which the registration takes place (which is, on its own, a protective measure).
Mobile App Activation Process Flow
The solution consists of two layers of the process. One is more predefined and is used to quickly guide the user through the verification screen flow in the mobile app - this is realized in the mobile-facing component called Onboarding Server. Other is realized via KYC Process Service based on a generic BPMN process with the modeler. This part enables the bank to model any situation and flow of document processing without additional development or changing the mobile application itself. The mobile-facing component and the KYC process ensure that the mobile application is informed about the current and next step of the process and can react with the corresponding screen flow.
For simplicity, the KYC itself is split on the mobile phone to follow subsequent phases.
- Initial Identification
- Document Verification
- Presence Verification
- Final Verification
In the Initial Identification phase, the Onboarding Server gets the configuration from the KYC Process Server:
- Way to initially identify a user (OTP verification, username, technical identifier).
- List of consents to display for the user.
- Which documents should be gathered in the process (if any).
- Optional additional OTP verification after the end of the verification process.
- Checks and controls (number of allowed failed attempts, daily total attempts per user, etc.)
If no document verification is required, the process simply skips to the next process phase, Presence Verification.
In Document Verification, the mobile app gathers the required documents per process type configuration and uploads the document scan to the Onboarding Server. The Onboarding Server checks the document with the Cloud API and uploads the result and extracted data to the KYC Process Service. After the signal from the KYC processing to approve (or reject) the attempt is received, the process continues.
In the Presence Verification phase, a similar logic applies to face verification. Enrollment Server Digital Onboarding initiates the verification session with Liveness Check SDK, informs the mobile application, and, after the face is scanned in the mobile application, verifies the result with the Cloud API. After that, inform the KYC Process server about the result and wait for approval.
After approval, if configured, the SCA signature from the client verifies the remote transaction of the digital onboarding and client.
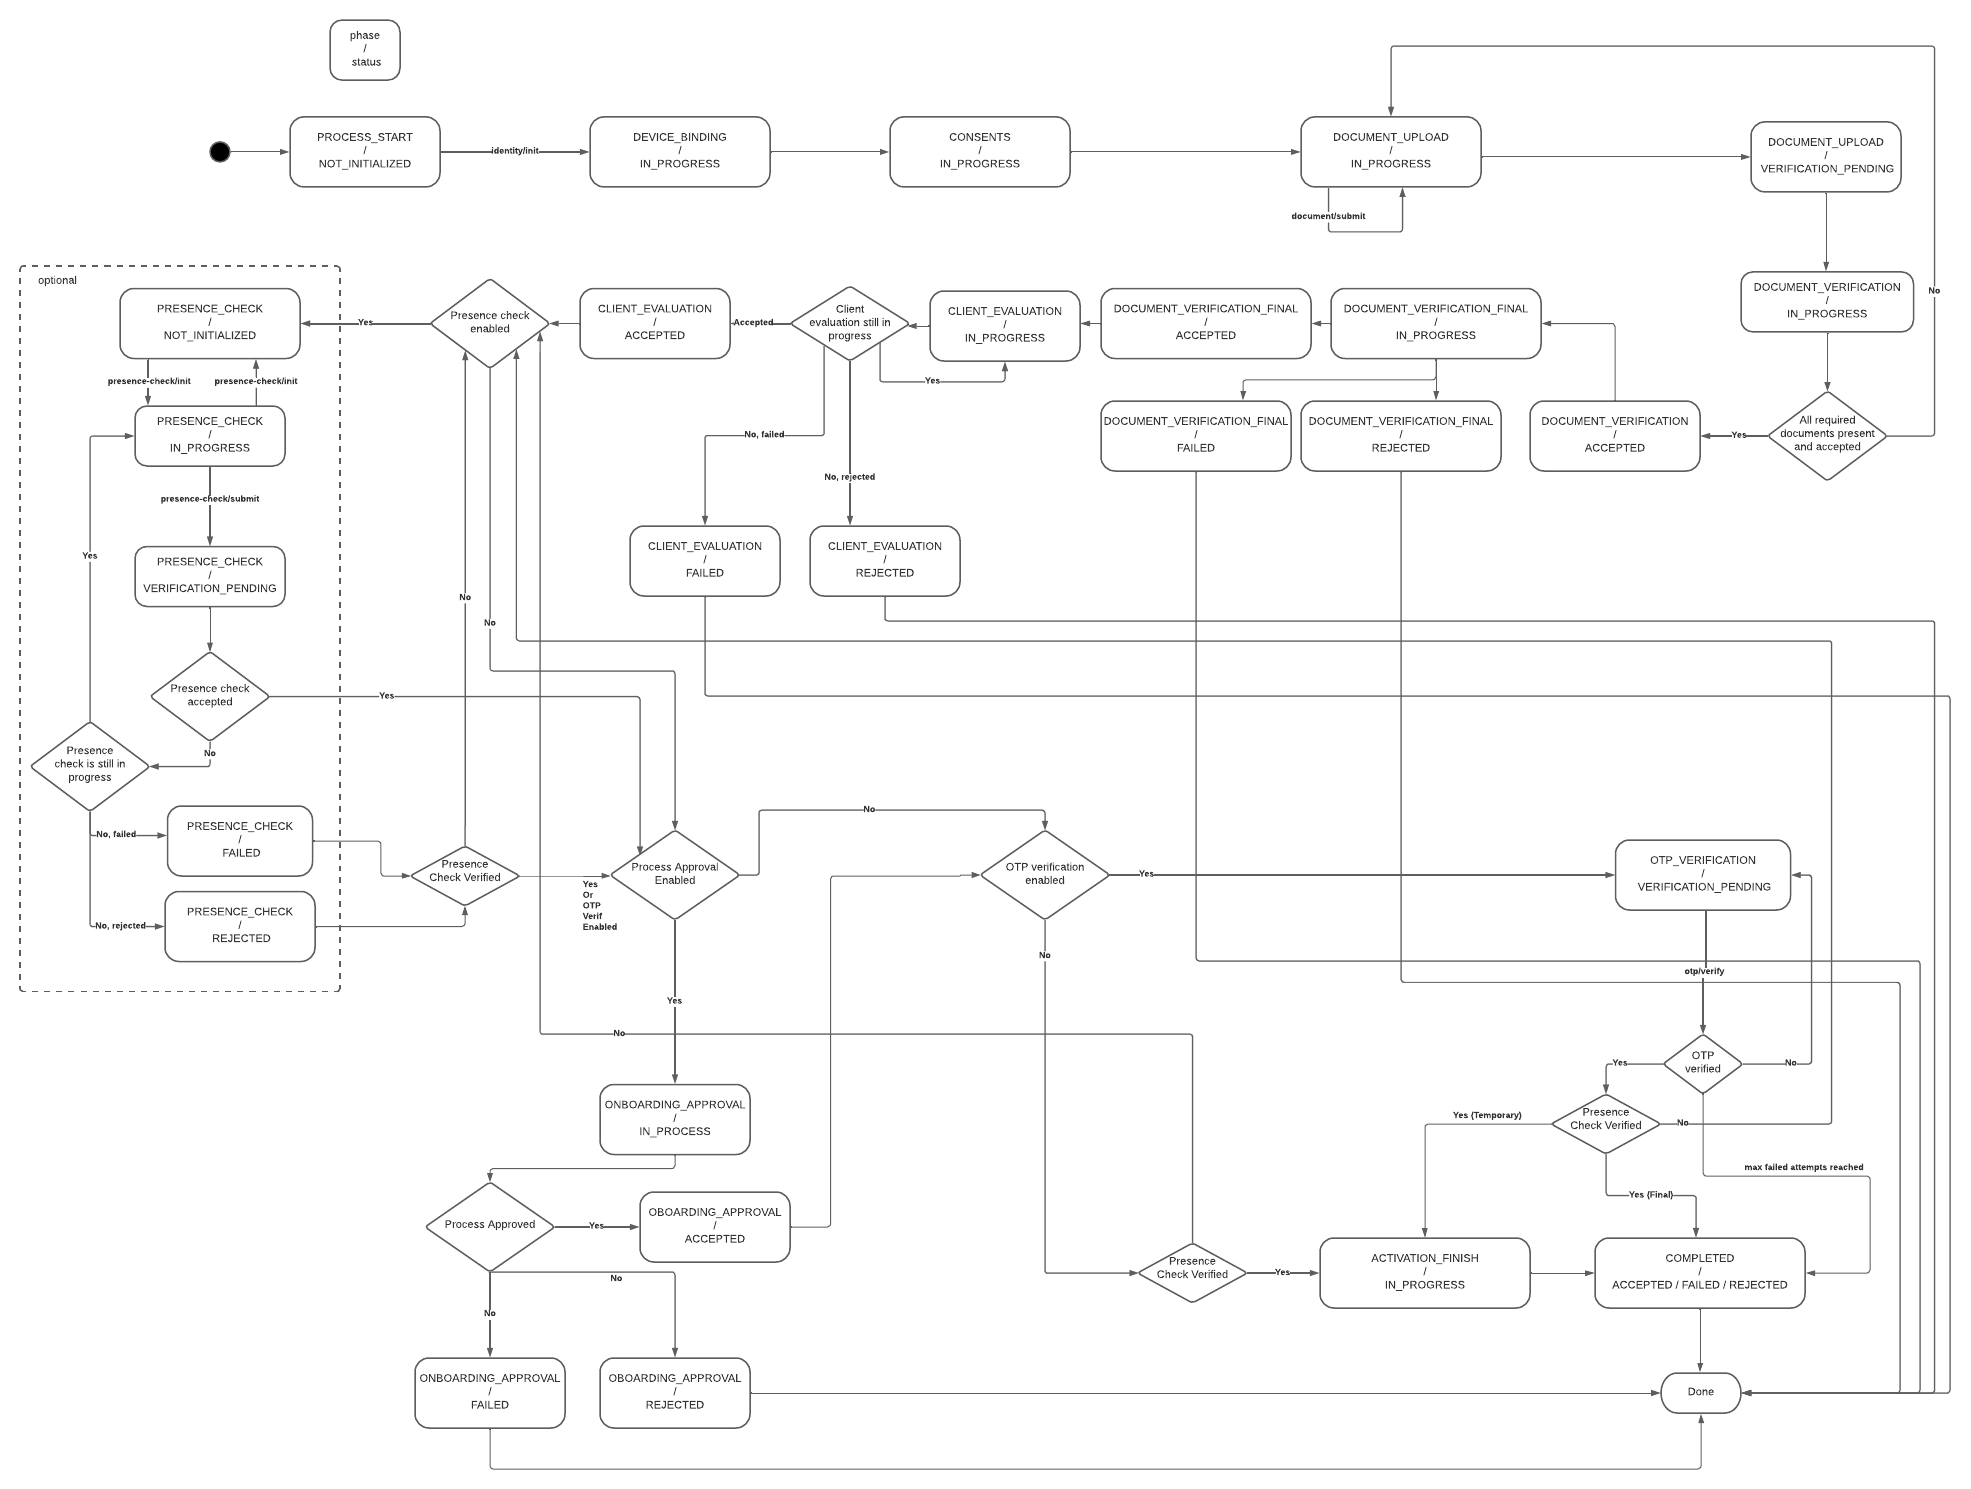
Onboarding Stages
| Stage | Description |
|---|---|
| User Identification | The user identification flow collects basic user and AML/KYC data, retrieves the required configuration, and starts a new process using user credentials. A semi-optional lookup can validate the user and determine consent needs. If OTP verification is required, it’s sent and entered to create the registration. The user then completes registration by setting a PIN. |
| Identity Verification | The identity verification flow collects user consent, verifies documents, and optionally evaluates client data. Presence and biometric checks are performed, followed by optional onboarding approval. An OTP may be sent for strong customer authentication if required. |
| Device Registration | Device registration differs by type: flagged registrations simply remove the verification flag, while temporary registrations finalize the user ID, create a new registration, and complete PIN/biometric setup. Both types can optionally trigger a process event. The flow concludes with the success screen. |
System Architecture
Security
Communication
All communication between components is protected by SSL/TLS. The mobile application endpoints provided by Onboarding Server employ end-to-end encryption to ensure that sensitive data remains encrypted throughout its lifecycle. This approach guarantees that data is only accessible by the server and protected from unauthorized access during transmission. All internal and external endpoints are protected by Basic or OAuth2 authorization. External components provide a means to rotate the credentials to mitigate the risk of credential leaks. The specific setup depends on the specific bank requirements.
Secrets
Sensitive configurations are managed via Docker environment variables, ensuring that secrets are not stored in plain text within the system. This enables credentials management via Kubernetes Secrets and mechanisms like Vault Secret Operator.
Encryption at Rest
All components expect transparent encryption on the database layer. Components like PowerAuthServer and UserData store enable additional application encryption, i.e., data are encrypted before persistence in the database by a discrete encryption key derived for the record. The KYC Process Service has the capability to encrypt sensitive data, but this has to be specified during the analytic phase.
Identity Management
All endpoints serving server-to-server communication are protected by Basic authentication or by OAuth Client Credential Flow. The OAuth2 protocol is expected for user access, i.e., access to the Case Management Console and Camunda administration. The console defines required permissions and entitlements for the functionality. The OAuth2 provider (like Entra ID) manages users and user-assigned roles.
Availability and Scaling
Any component in the system runs in a high-availability setup with disaster recovery. The application layer—i.e., pods are strictly stateless services, and synchronization, if needed, is done on the database layer. The database layer is expected to run in HA DR in at least an Active-Passive setup, but DB management is considered out of the scope of the response to the RFP.
Integration
The integration of the application components depends on the REST API. For asynchronous communication, the system uses REST Webhooks. No other technology is required. The connectors in KYC ProcessService can react to messages from Kafka or other messaging platforms, but this is not expected within the scope of this RFP.
Auditing and Monitoring
The systems work in standard layers:
- Application Logs
- Application Monitoring and APM
- Audit Logs
- Business Monitoring
Application Logs
All components provide structured logs to the standard output. Configuration can be changed by parameterizing the docker variable, but the recommended approach is sending logs to standard output. By default, the inline format is used, but as the application logging is based on SFL4J and logging is configurable, the format can be changed, for example, by adding a log stash encoder. All application logs contain standard tracing headers and can consume tracing headers on output and emit the tracing header when calling other systems to enable distributed log tracing.
Application monitoring and APM
The components provide a standard Spring actuator endpoint. This enables the standard connection of K8 health and readiness probes and integration with Prometheus. The component also has configurable micrometer tracing (by default, used for generating tracing headers) for tracers OpenTelemetry or Zipkin.
Audit Logs
The system keeps a full audit log of activities via the Wultra auditing library. The audit log is available in the database on a user basis via API. In addition, Camunda also keeps track of the activities of the process instance.
Business Monitoring
Business monitoring should be partially done on the application logs, and the KYC Process Service offers a Process monitoring dashboard as part of Camunda Tooling.
Data Residency and Data Retention
Components deployed on the bank are fully under the bank’s control, with all data and communication. The components either do not store data permanently or have data purging capabilities.
Performance Requirements
Based on the requested verification volumes, we expect a low number of requests per minute. The Enrollment Server Digital Onboarding component and KYC Connector Service can be deployed with sizing 4 vCPU and 6 GB RAM. No external volumes are required to run the docker image.
The KYC Process Service contains the Camunda engine, and the recommended setup is 2 vCPU and 3 GB RAM.
All components should be run in 2-3 instances to ensure high availability and disaster recovery capabilities.
Backup and Restore
The application layer is strictly stateless, and only the deployment pipeline should be backed up to enable new deployment to a new location in a disaster recovery scenario.
The underlying database should be backed up; the recommended approach is to complete a full backup regularly and, in parallel, forward the write-ahead logs (WAL) to different DR regions. In this case, RPO 0 can be reached. The exact DB strategy is in the bank’s governance based on the bank’s IT risk assessment of the KYC service.
System Parametrization and Configuration
The system parameterization consists of two major parts. One part focuses on process design and configuration. The process is designed using Camunda Console and Camunda products Modeler, Tasklist, and Connectors. This tool allows you to create or modify flows and attach required actions like external checks, user tasks, or automated rules. So, this is the component where the capabilities of the workflow engine built on Camunda are configured. The second part focuses on managing the Case Management console and integration settings. This part is configured on a technical level by Docker environment settings to ensure compatibility with any deployment type. Possible parameters are, for example, the OIDC server address, claim representing user roles, database connection URL…
Case Management
The Case management console serves two purposes. One is to manage the KYC process itself. This includes user task management (like assigning a task to a user) and user task execution (like manually approving the KYC process). This part is based on the Tasklist Camunda component. The second purpose is for post-process investigation - serving as back office or complaint officers. The console allows users to search for a specified client and see the details of his KYC cases with all data gathered from the document and face verifications.
User Flows
| User Flows | Description |
|---|---|
| New Client | Digital Onboarding starts with optional user data collection, consent, and AML/KYC. The process continues with PIN setup, document verification, face biometrics, optional OTP verification if required, and concludes with the success screen. |
| Client Recovery | This is a scenario for a known user with a lost or new device. The reconnection flow starts with application launch and user identification. The user may verify their identity via SMS OTP, then set up a new PIN and optionally enable biometric authentication. After providing consent (if required), the user completes document verification and face biometrics. The process concludes with final OTP verification if needed and a success screen, confirming the device has been reconnected. |
| Re-KYC | It begins with the user providing consent, followed by document verification, face biometric authentication, and SMS OTP verification (SCA step). Upon successful verification, the user reaches the success screen, completing the Re-KYC process. |
| Authentication Step-Up | High-risk transactions can be secured with additional face biometric verification that compares the user`s captured face with a trusted image. |
Document Verification
The solution verifies the authenticity and liveness of the document using various checks and extracts data using optical character recognition (OCR). The extracted data contains text strings and a trusted image of the user’s face. This image is used for the Liveness Check by default.
- Document authenticity
- Document liveness
- Data extraction
Document Checks
Below is a list of the possible checks that may be performed during verification.
Visual/Fraud Checks
| Check | Description |
|---|---|
| SecurityFeatures | Analyzes security features like holograms to determine whether the document is legitimate. |
| PhotoForgeryCheck | Checks whether the profile photo on the document has been tampered with. |
| GenerativeAICheck | It checks whether the document has been generated by AI. |
Data Checks
| Check | Description |
|---|---|
| MatchCheck | Checks if the fields are in the correct format based on our document knowledge. |
| DataMatchCheck | Checks if the data makes sense, for example that the date of expiration is after the date of issuance. |
| BarcodeAnomalyCheck | Checks if the barcode on the document is accurate and authentic. |
| SuspiciousDataCheck | Checks for sample and specimen text in the data fields and suspicious number of sequences. |
| DataIntegrityCheck | Checks if the document has all the data fields that it should contain. |
| MrzCheck | Checks the MRZ format and its consistency with the data in the other fields. |
Document Liveness Checks
| Check | Description |
|---|---|
| ScreenCheck | Determines if the document is presented on a screen (phone, tablet, desktop). |
| PhotocopyCheck | Checks if the image of the ID is a black & white photocopy or a colored print out. |
| HandPresenceCheck* | Checks whether the document is physically held in hand. |
*HandPresenceCheck doesn’t impact the overall liveness verdict.
Document Validity Checks
| Check | Description |
|---|---|
| ExpiredCheck | Determines whether this particular document is expired. |
| VersionCheck | Checks whether this type of document is acceptable in its jurisdiction today. |
Image Quality Checks
| Check | Description |
|---|---|
| ClarityCheck | A combination of a lot of heuristics and ML models that assesses the clarity of the image. |
| BlurCheck | Checks whether the image is blurry enough to be unverifiable. |
| CropCheck | It’s not possible to perform all of our checks without full context, so it checks whether the document is not too close to the edges. |
Please note that not all checks apply to all document types: for example, barcode checks only apply to documents containing barcodes.
Document Checks Configuration
The sensitivity (or strictness) of the selected checks can be adjusted to suit a specific process. The aim is always to strike a balance between high conversion and fraud detection. We recommend sticking with the default settings and only adjusting the sensitivity if necessary based on data gathered during the operation.
The following attributes can be either disabled or set the level on 10 point scale:
| Attribute | Description |
|---|---|
| ScreenMatchLevel | Specifies the match level for screen anomalies. |
| PhotocopyMatchLevel | Specifies the match level for photocopy anomalies. |
| PhotoForgeryMatchLevel | Specifies the match level for photo forgery. |
| StaticSecurityFeaturesMatchLevel | Specifies the match level for static security features. |
| DataMatchMatchLevel | Specifies the match level for data inconsistencies. |
| BarcodeAnomalyMatchLevel | Specifies the match level for barcode checks. |
| GenerativeAiMatchLevel | Specifies the match level for generative AI checks. |
A few other parameters related to image quality can be adjusted (blur, glare, lighting, sharpness, DPI and tilt). However, these changes are usually unnecessary.
Document Verification process
Verification process requires two sequential steps.
- Capture document images on the device
- Complete the document verification and get the result
Document Capture
This is a process in which the user scans documents using a mobile application. The number of documents to be scanned depends on the configuration. For some documents, such as passports, only one side needs to be scanned, whereas for others, such as ID cards, both sides need to be scanned.
For document scanning, we recommend using the provided Document Verification SDK, which ensures the best possible capture conditions, offers a great user experience (UX) and provides feedback codes available immediately after the scan, enabling the mobile application to react accordingly and help achieve a higher conversion rate in the event of errors relating to the conditions.
Document image requirements
- Supported media types: PNG, JPEG
- Resolution: FullHD - 4K
The Document Capture SDK provides the required images.
Document Verification Result
The verification status is either ‘SUCCESS’ or ‘FAILURE’.
We also provide a score on a scale from 0 to 10, reflecting the lowest level of certainty among the passing Visual/Fraud checks. However, this is more statistical information because there are multiple fraud checks, and even if one of them has a lower score, the others that pass can cause the whole document to pass.
The evaluation logic is based on different weights, whereby some checks are given greater importance (e.g. photocopy detection), while others are given less importance.
As mentioned in the section ‘Document Checks Configuration’, the sensitivity of the checks can be adjusted.
The verification result also contains the following data:
- information about performed checks
- extracted user and document data in text format
- extracted user’s face that is, by default, used as a trusted image for liveness check
- cropped image showing the front and back of the document
Liveness Check
The Liveness check ensures that an online user is the right person, real person, and authenticating in real-time, effectively guarding against imposters and cyber threats. User’s face is compared with the provided trusted image, which is by default extracted from the verified document.
- Right person
- Real person
- Right now
Detection Modes
Verification can be performed in two modes: Express Liveness or Dynamic Liveness. Selected mode can be configured per use-case.
Express Liveness: Verifies it’s a real person in front of a camera, not someone attempting to spoof the system. Individuals simply align their face in the oval on the screen for a near-instant face capture. The imagery is analyzed for signs of spoofs presented to the camera, such as 2D and 3D masks, photos, and presented videos and deepfakes. The device is analyzed for signs of spoofs injected into the system, such as virtual cameras, emulators, code modifications, and Man-in-the-Middle attacks (MiTM).
Dynamic Liveness: Verifies it’s a real person and they’re authenticating in real time, delivering the highest level of identity assurance and mission-critical deepfake defense. The advanced security levels are achieved by patented Flashmark™ technology which illuminates the device screen during the face capture process. The reflection of light on the individual’s face confirms they’re genuinely present and delivers advanced mitigation of AI-based attacks, like deepfakes and face swaps.
Liveness Check Process
Liveness check process requires three sequential steps.
- Upload a trusted image
- Scan face during biometric session.
- Complete the liveness check and get the result
Trusted Image Upload
Trusted image is a photo of the user’s face that will be used for face matching. By default, we use the photo extracted from the verified document in the previous step. However, clients can use their own database of trusted images if they have one.
Trusted image requirements
- Supported media types: PNG, JPEG, and JP2
- Max image size: 2 MB
- The image should conform to: ISO/IEC 19794 Information technology — Biometric data interchange formats (Part 5 Face image data)
- Minimum distance between the eyes: 85 pixels
A face photo extracted from the ‘Document Verification’ step fulfils those requirements.
Face Scan
This is a process in which the user scans their face using a provided Liveness Check SDK. The results, together with the feedback codes, are available immediately after the scan via the mobile SDK, enabling the mobile application to react accordingly and help achieve a higher conversion rate in the event of errors relating to the conditions.
Read more about Detection modes.
Liveness Check Result
The verification status is either ‘SUCCESS’ or ‘FAILURE’.
The verification result also contains a frame of the user’s face from the biometrics session, which can be used as evidence.
Authentication Step-Up
To minimize damage in fraudulent scenarios, including remote desktop fraud, we recommend designing techniques for step-up authentication. That’s why we offer liveness verification as an easy-to-use, separate component.
You can apply the authentication step up to server-side biometry in several situations, for example:
- For any payment approval, in case the user logs in via PIN code (to enforce independent factors for login and payment approvals in the same session when the PIN code could have been compromised during login).
- For a high-value transaction, or for every ~10th transaction (to prevent the fraud being carried out via several smaller payments).
- For a transaction to any new account number.
- To change sensitive customer data such as password or phone number.
- Of course, you can also deploy a more complex decision-making based on the responses from your fraud detection system.